


Overview
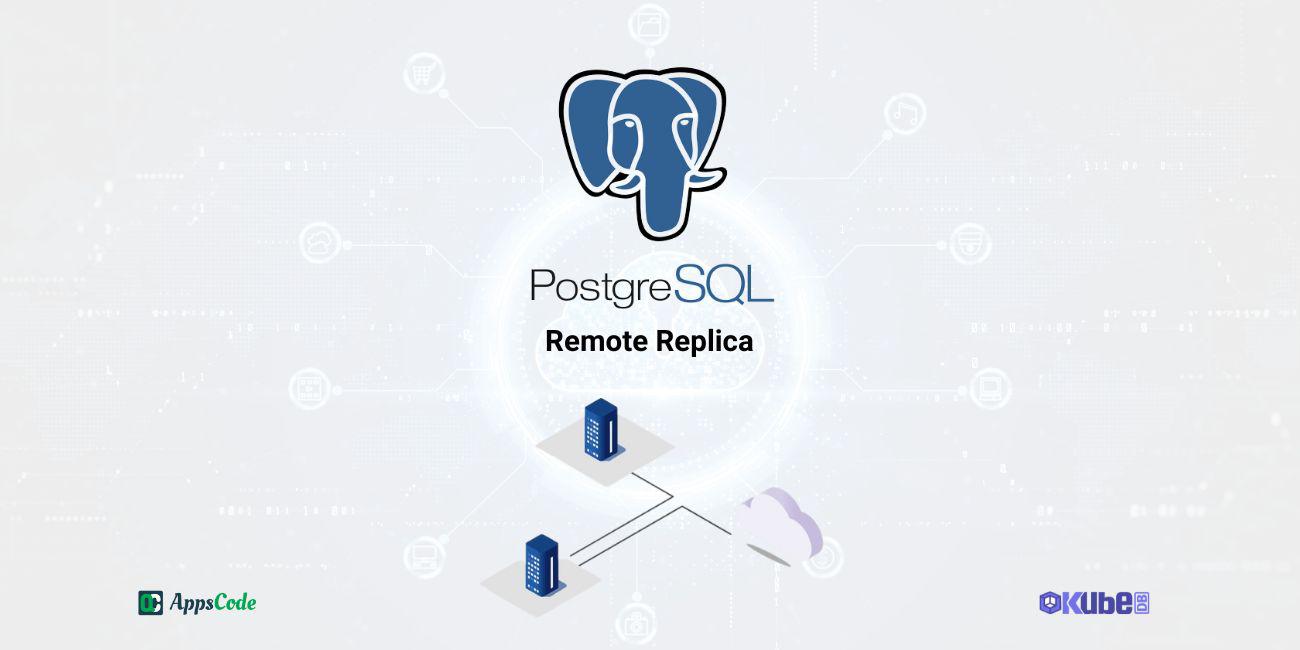
KubeDB is the Kubernetes Native Database Management Solution which simplifies and automates routine database tasks such as Provisioning, Monitoring, Upgrading, Patching, Scaling, Volume Expansion, Backup, Recovery, Failure detection, and Repair for various popular databases on private and public clouds. The databases that KubeDB supports are MongoDB, Kafka, Elasticsearch, MySQL, MariaDB, Redis, PostgreSQL, ProxySQL, Percona XtraDB, Memcached and PgBouncer. You can find the guides to all the supported databases in KubeDB . In this tutorial we will show how to deploy PostgreSQL Remote Replica across cluster. Remote Replica allows you to replicate data from an KubeDB managed PostgreSQL server to a read-only PostgreSQL server. The whole process uses PostgreSQL asynchronous replication to keep up-to-date the replica with source server. It’s useful to use Remote Replica to scale of read-intensive workloads, can be a workaround for your BI and analytical workloads and can be geo-replicated. We will cover the following steps:
- Install KubeDB
- Deploy PostgreSQL with TLS/SSL
- Insert Sample Data
- Deploy PostgreSQL in a Different Region
- Validate Remote Replica
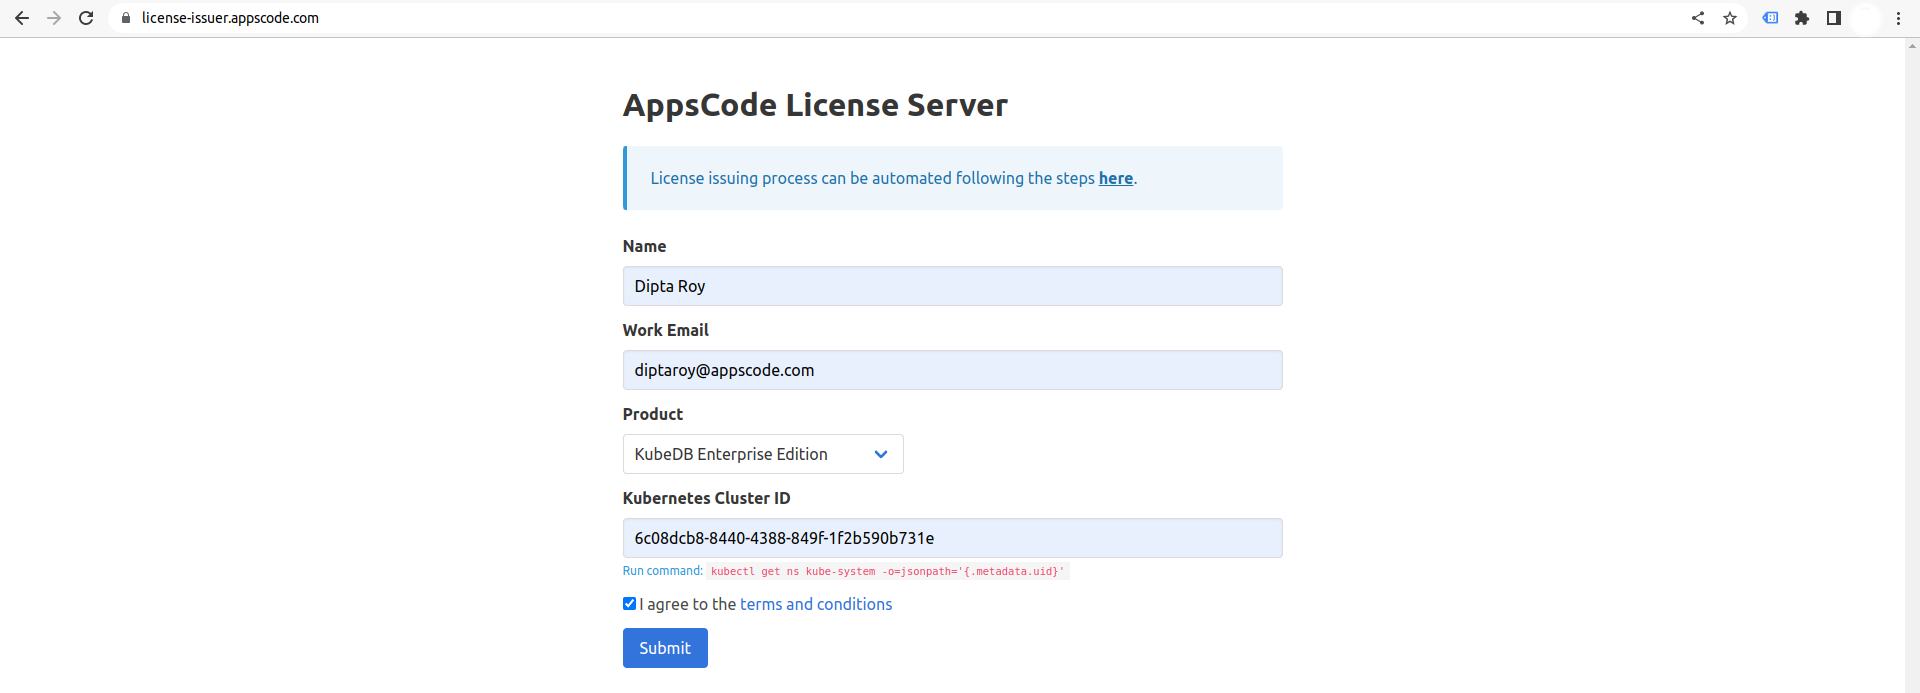
Get Cluster ID
We need the cluster ID to get the KubeDB License. To get cluster ID, we can run the following command:
$ kubectl get ns kube-system -o jsonpath='{.metadata.uid}'
6c08dcb8-8440-4388-849f-1f2b590b731e
Get License
Go to Appscode License Server to get the license.txt file. For this tutorial we will use KubeDB Enterprise Edition.
Install KubeDB
We will use helm to install KubeDB. Please install helm here
if it is not already installed.
Now, let’s install KubeDB.
$ helm repo add appscode https://charts.appscode.com/stable/
$ helm repo update

$ helm search repo appscode/kubedb
NAME                              	CHART VERSION	APP VERSION	DESCRIPTION
appscode/kubedb                   	v2023.10.9   	v2023.10.9 	KubeDB by AppsCode - Production ready databases...
appscode/kubedb-autoscaler        	v0.21.0      	v0.21.0    	KubeDB Autoscaler by AppsCode - Autoscale KubeD...
appscode/kubedb-catalog           	v2023.10.9   	v2023.10.9 	KubeDB Catalog by AppsCode - Catalog for databa...
appscode/kubedb-community         	v0.24.2      	v0.24.2    	KubeDB Community by AppsCode - Community featur...
appscode/kubedb-crds              	v2023.10.9   	v2023.10.9 	KubeDB Custom Resource Definitions
appscode/kubedb-dashboard         	v0.12.0      	v0.12.0    	KubeDB Dashboard by AppsCode
appscode/kubedb-enterprise        	v0.11.2      	v0.11.2    	KubeDB Enterprise by AppsCode - Enterprise feat...
appscode/kubedb-grafana-dashboards	v2023.10.9   	v2023.10.9 	A Helm chart for kubedb-grafana-dashboards by A...
appscode/kubedb-metrics           	v2023.10.9   	v2023.10.9 	KubeDB State Metrics
appscode/kubedb-one               	v2023.10.9   	v2023.10.9 	KubeDB and Stash by AppsCode - Production ready...
appscode/kubedb-ops-manager       	v0.23.0      	v0.23.1    	KubeDB Ops Manager by AppsCode - Enterprise fea...
appscode/kubedb-opscenter         	v2023.10.9   	v2023.10.9 	KubeDB Opscenter by AppsCode
appscode/kubedb-provisioner       	v0.36.0      	v0.36.1    	KubeDB Provisioner by AppsCode - Community feat...
appscode/kubedb-schema-manager    	v0.12.0      	v0.12.0    	KubeDB Schema Manager by AppsCode
appscode/kubedb-ui                	v2023.10.1   	0.4.5      	A Helm chart for Kubernetes
appscode/kubedb-ui-server         	v2021.12.21  	v2021.12.21	A Helm chart for kubedb-ui-server by AppsCode
appscode/kubedb-webhook-server    	v0.12.0      	v0.12.0    	KubeDB Webhook Server by AppsCode

# Install KubeDB Enterprise operator chart
$ helm install kubedb appscode/kubedb \
  --version v2023.10.9 \
  --namespace kubedb --create-namespace \
  --set kubedb-provisioner.enabled=true \
  --set kubedb-ops-manager.enabled=true \
  --set kubedb-autoscaler.enabled=true \
  --set kubedb-dashboard.enabled=true \
  --set kubedb-schema-manager.enabled=true \
  --set-file global.license=/path/to/the/license.txt
Let’s verify the installation:
$ kubectl get pods --all-namespaces -l "app.kubernetes.io/instance=kubedb"
NAMESPACE   NAME                                            READY   STATUS    RESTARTS   AGE
kubedb      kubedb-kubedb-autoscaler-5b8b948645-n5jhk       1/1     Running   0          81s
kubedb      kubedb-kubedb-dashboard-54b55ffcf6-7sbsf        1/1     Running   0          81s
kubedb      kubedb-kubedb-ops-manager-8449f79bb8-27szq      1/1     Running   0          81s
kubedb      kubedb-kubedb-provisioner-fdf4c96f7-qmtt2       1/1     Running   0          81s
kubedb      kubedb-kubedb-schema-manager-695c94f9c7-fxnkz   1/1     Running   0          81s
kubedb      kubedb-kubedb-webhook-server-8647d646d9-jj4x7   1/1     Running   0          81s
We can list the CRD Groups that have been registered by the operator by running the following command:
$ kubectl get crd -l app.kubernetes.io/name=kubedb
NAME                                              CREATED AT
elasticsearchautoscalers.autoscaling.kubedb.com   2023-10-20T05:56:23Z
elasticsearchdashboards.dashboard.kubedb.com      2023-10-20T05:55:14Z
elasticsearches.kubedb.com                        2023-10-20T05:55:14Z
elasticsearchopsrequests.ops.kubedb.com           2023-10-20T05:55:55Z
elasticsearchversions.catalog.kubedb.com          2023-10-20T05:52:52Z
etcds.kubedb.com                                  2023-10-20T05:55:33Z
etcdversions.catalog.kubedb.com                   2023-10-20T05:52:52Z
kafkaopsrequests.ops.kubedb.com                   2023-10-20T05:56:28Z
kafkas.kubedb.com                                 2023-10-20T05:55:35Z
kafkaversions.catalog.kubedb.com                  2023-10-20T05:52:52Z
mariadbautoscalers.autoscaling.kubedb.com         2023-10-20T05:56:23Z
mariadbdatabases.schema.kubedb.com                2023-10-20T05:55:04Z
mariadbopsrequests.ops.kubedb.com                 2023-10-20T05:56:09Z
mariadbs.kubedb.com                               2023-10-20T05:55:04Z
mariadbversions.catalog.kubedb.com                2023-10-20T05:52:52Z
memcacheds.kubedb.com                             2023-10-20T05:55:33Z
memcachedversions.catalog.kubedb.com              2023-10-20T05:52:52Z
mongodbautoscalers.autoscaling.kubedb.com         2023-10-20T05:56:23Z
mongodbdatabases.schema.kubedb.com                2023-10-20T05:55:04Z
mongodbopsrequests.ops.kubedb.com                 2023-10-20T05:55:59Z
mongodbs.kubedb.com                               2023-10-20T05:55:04Z
mongodbversions.catalog.kubedb.com                2023-10-20T05:52:52Z
mysqlautoscalers.autoscaling.kubedb.com           2023-10-20T05:56:23Z
mysqldatabases.schema.kubedb.com                  2023-10-20T05:55:04Z
mysqlopsrequests.ops.kubedb.com                   2023-10-20T05:56:06Z
mysqls.kubedb.com                                 2023-10-20T05:55:04Z
mysqlversions.catalog.kubedb.com                  2023-10-20T05:52:52Z
perconaxtradbautoscalers.autoscaling.kubedb.com   2023-10-20T05:56:23Z
perconaxtradbopsrequests.ops.kubedb.com           2023-10-20T05:56:21Z
perconaxtradbs.kubedb.com                         2023-10-20T05:55:34Z
perconaxtradbversions.catalog.kubedb.com          2023-10-20T05:52:52Z
pgbouncers.kubedb.com                             2023-10-20T05:55:34Z
pgbouncerversions.catalog.kubedb.com              2023-10-20T05:52:52Z
postgresautoscalers.autoscaling.kubedb.com        2023-10-20T05:56:23Z
postgresdatabases.schema.kubedb.com               2023-10-20T05:55:04Z
postgreses.kubedb.com                             2023-10-20T05:55:04Z
postgresopsrequests.ops.kubedb.com                2023-10-20T05:56:15Z
postgresversions.catalog.kubedb.com               2023-10-20T05:52:52Z
proxysqlautoscalers.autoscaling.kubedb.com        2023-10-20T05:56:23Z
proxysqlopsrequests.ops.kubedb.com                2023-10-20T05:56:18Z
proxysqls.kubedb.com                              2023-10-20T05:55:34Z
proxysqlversions.catalog.kubedb.com               2023-10-20T05:52:52Z
publishers.postgres.kubedb.com                    2023-10-20T05:56:31Z
redisautoscalers.autoscaling.kubedb.com           2023-10-20T05:56:23Z
redises.kubedb.com                                2023-10-20T05:55:35Z
redisopsrequests.ops.kubedb.com                   2023-10-20T05:56:12Z
redissentinelautoscalers.autoscaling.kubedb.com   2023-10-20T05:56:23Z
redissentinelopsrequests.ops.kubedb.com           2023-10-20T05:56:25Z
redissentinels.kubedb.com                         2023-10-20T05:55:35Z
redisversions.catalog.kubedb.com                  2023-10-20T05:52:52Z
subscribers.postgres.kubedb.com                   2023-10-20T05:56:34Z
Deploy PostgreSQL Server
We are going to Deploy PostgreSQL server using KubeDB. First, let’s create a Namespace in which we will deploy the database.
$ kubectl create namespace demo
namespace/demo created
Create Issuer
We will create a TLS secured instance since were planning to replicate across cluster. Lets start with creating a secret to access database and we will deploy a TLS secured instance. So, we will to create an example Issuer that will be used throughout the duration of this tutorial. Alternatively, you can follow this cert-manager
to create your own Issuer. By following the below steps, we are going to create our desired Issuer,
$ openssl req -x509 -nodes -days 365 -newkey rsa:2048 -keyout ./ca.key -out ./ca.crt -subj "/CN=postgres/O=kubedb"

$ kubectl create secret tls pg-ca \
     --cert=ca.crt \
     --key=ca.key \
     --namespace=demo
secret/pg-ca created
Now, we are going to create an Issuer using the pg-ca secret that holds the ca-certificate we have just created. Below is the YAML of the Issuer CR that we are going to create,
apiVersion: cert-manager.io/v1
kind: Issuer
metadata:
  name: pg-issuer
  namespace: demo
spec:
  ca:
    secretName: pg-ca
Let’s create the Issuer we have shown above,
$ kubectl apply -f pg-issuer.yaml
issuer.cert-manager.io/pg-issuer created
Create Auth Secret
apiVersion: v1
data:
  password: cGFzcw==
  username: cG9zdGdyZXM=
kind: Secret
metadata:
  name: pg-singapore-auth
  namespace: demo
type: kubernetes.io/basic-auth
Let’s create the Auth Secret we have shown above,
$ kubectl apply -f pg-singapore-auth.yaml
secret/pg-singapore-auth created
Deploy PostgreSQL with TLS/SSL configuration
Here is the yaml of the PostgreSQL CRO we are going to use:
apiVersion: kubedb.com/v1alpha2
kind: Postgres
metadata:
  name: pg-singapore
  namespace: demo
spec:
  authSecret:
    name: pg-singapore-auth
  version: "15.3"
  allowedSchemas:
    namespaces:
      from: Same
  autoOps: {}
  clientAuthMode: md5
  replicas: 3
  sslMode: verify-ca
  standbyMode: Hot
  streamingMode: Synchronous
  tls:
    issuerRef:
      apiGroup: cert-manager.io
      name: pg-issuer
      kind: Issuer
    certificates:
    - alias: server
      subject:
        organizations:
        - kubedb:server
      dnsNames:
      - localhost
      ipAddresses:
      - "127.0.0.1"
  storage:
    accessModes:
    - ReadWriteOnce
    resources:
      requests:
        storage: 1Gi
    storageClassName: linode-block-storage
  storageType: Durable
  terminationPolicy: WipeOut
Let’s save this yaml configuration into pg-singapore.yaml
Then create the above PostgreSQL CRO
$ kubectl apply -f pg-singapore.yaml
postgres.kubedb.com/pg-singapore created
In this yaml,
spec.versionfield specifies the version of PostgreSQL. Here, we are using PostgreSQL15.1. You can list the KubeDB supported versions of PostgreSQL by running$ kubectl get postgresversionscommand.spec.replicasspecifies the total number of primary and standby nodes in PostgreSQL database cluster configuration.spec.storage.storageClassNameis the name of the StorageClass used to provision PVCs.spec.terminationPolicyfield is Wipeout means that the database will be deleted without restrictions. It can also be “Halt”, “Delete” and “DoNotTerminate”. Learn More about these checkout Termination Policy .
Let’s check if the database is ready to use,
$ kubectl get pg -n demo
NAME              VERSION   STATUS   AGE
pg-singapore      15.3      Ready    22h
We have successfully deployed PostgreSQL. Now we can exec into the container to use the database.
Expose PostgreSQL to Outside
Here, we will expose our PostgreSQL with ingress to outside,
$ helm repo add ingress-nginx https://kubernetes.github.io/ingress-nginx
$ helm upgrade -i ingress-nginx ingress-nginx/ingress-nginx  \
                                      --namespace demo --create-namespace \
                                      --set tcp.5432="demo/pg-singapore:5432"
Let’s apply the ingress YAML thats refers to pg-singpore service
apiVersion: networking.k8s.io/v1
kind: Ingress
metadata:
  name: pg-singapore
  namespace: demo
spec:
  ingressClassName: nginx
  rules:
  - host: pg-singapore.something.org
    http:
      paths:
      - backend:
          service:
            name: pg-singapore
            port:
              number: 5432
        path: /
        pathType: Prefix
Save this yaml configuration into pg-singapore.yaml and apply it,
$ kubectl apply -f pg-singapore.yaml
ingress.networking.k8s.io/pg-singapore created
Let’s check the ingress,
$ kubectl get ingress -n demo
NAME              CLASS   HOSTS                           ADDRESS          PORTS   AGE
pg-singapore      nginx   pg-singapore.something.org      172.104.37.147   80      22h
Now will be able to communicate from another cluster to our source database.
Prepare for Remote Replica
We wil use the KubeDB Plugin to generate YAML configuration for Remote Replica. It will create the AppBinding and and necessary secrets to connect with the source server.
$ kubectl dba remote-config postgres -n demo pg-singapore -uremote -ppass -d 172.104.37.147 -y
home/mehedi/go/src/kubedb.dev/yamls/postgres/pg-singapore-remote-config.yaml
Prepare for Remote Replica
We have prepared another cluster like above but now for London region for replicating across cluster.
Create sourceRef
We will apply the generated YAML config from kubeDB plugin to create the sourceRefs and secrets for it.
$ kubectl apply -f  /home/test/yamls/pg-singapore-remote-config.yaml

secret/pg-singapore-remote-replica-auth created
secret/pg-singapore-client-cert-remote created
appbinding.appcatalog.appscode.com/pg-singapore created
Create Remote Replica Auth
Here, we will need to use the same Auth secrets for Remote Replicas since operations like clone also replicated the auth-secrets from the source server.
apiVersion: v1
data:
  password: cGFzcw==
  username: cG9zdGdyZXM=
kind: Secret
metadata:
  name: pg-london-auth
  namespace: demo
type: kubernetes.io/basic-auth
Let’s save this yaml configuration into pg-london-auth.yaml and apply it,
$ kubectl apply -f pg-london-auth.yaml
secret/pg-london-auth created
Deploy PostgreSQL in a Different Region
apiVersion: kubedb.com/v1alpha2
kind: Postgres
metadata:
  name: pg-london
  namespace: demo
spec:
  remoteReplica:
    sourceRef:
      name: pg-singapore
      namespace: demo
  version: "15.3"
  healthChecker:
    failureThreshold: 1
    periodSeconds: 10
    timeoutSeconds: 10
    disableWriteCheck: true
  authSecret:
    name: pg-london-auth
  clientAuthMode: md5
  standbyMode: Hot
  replicas: 1
  storage:
    accessModes:
      - ReadWriteOnce
    resources:
      requests:
        storage: 1Gi
    storageClassName: linode-block-storage
  storageType: Durable
  terminationPolicy: WipeOut
In this yaml,
spec.versionfield specifies the version of PostgreSQL. Here, we are using PostgreSQL15.1. You can list the KubeDB supported versions of PostgreSQL by running$ kubectl get postgresversionscommand.spec.replicasspecifies the total number of primary and standby nodes in PostgreSQL database cluster configuration.spec.storage.storageClassNameis the name of the StorageClass used to provision PVCs.spec.terminationPolicyfield is Wipeout means that the database will be deleted without restrictions. It can also be “Halt”, “Delete” and “DoNotTerminate”. Learn More about these checkout Termination Policy .
Let’s save this yaml configuration into pg-london.yaml
Then apply the above PostgreSQL CRO
$ kubectl apply -f pg-london.yaml
postgres.kubedb.com/pg-london created
Now, KubeDB will provision a Remote Replica from the source PostgreSQL instance. KubeDB operator sets the status.phase to Ready once the database is successfully created. Run the following command to see the modified PostgreSQL object:
$ kubectl get pg -n demo
NAME           VERSION   STATUS   AGE
pg-london      15.3      Ready    7m17s
Validate Remote Replica
Since both source and replica database are in the ready state, now we can validate Remote Replica,
Validate from Source
$ kubectl exec -it -n demo pg-singapore-0 -c postgres -- psql -c "select * from pg_stat_replication";
  pid   | usesysid | usename  | application_name | client_addr | client_hostname | client_port |         backend_start         | backend_xmin |   state   | sent_lsn  | write_lsn | flush_lsn | replay_lsn |    write_lag    |    flush_lag    |   replay_lag    | sync_priority | sync_state |          reply_time
--------+----------+----------+------------------+-------------+-----------------+-------------+-------------------------------+--------------+-----------+-----------+-----------+-----------+------------+-----------------+-----------------+-----------------+---------------+------------+-------------------------------
    121 |       10 | postgres | pg-singapore-1   | 10.2.1.13   |                 |       37990 | 2023-10-12 06:53:50.402925+00 |              | streaming | 0/89758A8 | 0/89758A8 | 0/89758A8 | 0/89758A8  | 00:00:00.000745 | 00:00:00.00484  | 00:00:00.004848 |             1 | quorum     | 2023-10-13 05:43:53.817575+00
    209 |       10 | postgres | pg-singapore-2   | 10.2.0.11   |                 |       51270 | 2023-10-12 06:54:15.759067+00 |              | streaming | 0/89758A8 | 0/89758A8 | 0/89758A8 | 0/89758A8  | 00:00:00.000581 | 00:00:00.009797 | 00:00:00.009955 |             1 | quorum     | 2023-10-13 05:43:53.823562+00
 205338 |    16394 | remote   | pg-london-0      | 10.2.1.10   |                 |       34850 | 2023-10-12 20:15:07.751715+00 |              | streaming | 0/89758A8 | 0/89758A8 | 0/89758A8 | 0/89758A8  | 00:00:00.158877 | 00:00:00.163418 | 00:00:00.163425 |             0 | async      | 2023-10-13 05:43:53.900061+00
(3 rows)

### Validate from remote replica

$ kubectl exec -it -n demo pg-london-0 -c postgres -- psql -c "select * from pg_stat_wal_receiver";
 pid  |  status   | receive_start_lsn | receive_start_tli | written_lsn | flushed_lsn | received_tli |      last_msg_send_time       |     last_msg_receipt_time     | latest_end_lsn |        latest_end_time        | slot_name |  sender_host   | sender_port |                                                                                                                                                                                                               conninfo
------+-----------+-------------------+-------------------+-------------+-------------+--------------+-------------------------------+-------------------------------+----------------+-------------------------------+-----------+----------------+-------------+--------------------------------------------------------------------------------------------------------------------------------------------------------------------------------------------------------------------------------------------------------------------------------------------------------------------------------------------------------------------------------------------------------------------------------------
 4813 | streaming | 0/8000000         |                 1 | 0/8DC01E0   | 0/8DC01E0   |            1 | 2023-10-13 05:54:33.812544+00 | 2023-10-13 05:54:33.893159+00 | 0/8DC01E0      | 2023-10-13 05:54:33.812544+pplication_name=walreceiver sslmode=verify-full sslcompression=0 sslcert=/tls/certs/remote/client.crt sslkey=/tls/certs/remote/client.key sslrootcert=/tls/certs/remote/ca.crt sslsni=1 ssl_min_protocol_version=TLSv1.2 gssencmode=prefer krbsrvname=postgres target_session_attrs=any
(1 row)
## Validation data replication
lets create a a database and insert some data

$ kubectl exec -it -n demo pg-singapore-0 -c postgres -- psql -c "create database hi";
CREATE DATABASE

$ kubectl exec -it -n demo pg-singapore-0 -c postgres -- psql -c "create table tab_1 ( a int); insert into tab_1 values(generate_series(1,5))";
CREATE TABLE
INSERT 0 5

### Validate data on primary
kubectl exec -it -n demo pg-singapore-0 -c postgres -- psql -c "select * from tab_1";
 a
---
 1
 2
 3
 4
 5
(5 rows)

### Validate data on remote replica

$ kubectl exec -it -n demo pg-london-0 -c postgres -- psql -c "select * from tab_1";
 a
---
 1
 2
 3
 4
 5
(5 rows)
So, we’ve successfully accessed the sample data from different region via Remote Replica.
Failover Remote Replica
In case you need to rsync with the primary cluster or any other secondary if available with pg_rewind, if rewinds failed you will need to take a base-backup from primary
$ kubectl exec -it -ndemo  pg-london-0 -- bash
    $ pg_rewind  --source-server "user=postgres password=pass host= 172.104.37.147 port=5432" --target-pgdata /var/pv/data
If you want to learn more about Production-Grade PostgreSQL you can have a look into that playlist below:
Support
To speak with us, please leave a message on our website .
To receive product announcements, follow us on Twitter .
To watch tutorials of various Production-Grade Kubernetes Tools Subscribe our YouTube channel.
More about PostgreSQL on Kubernetes
If you have found a bug with KubeDB or want to request for new features, please file an issue .