


Overview
KubeDB is the Kubernetes Native Database Management Solution which simplifies and automates routine database tasks such as Provisioning, Monitoring, Upgrading, Patching, Scaling, Volume Expansion, Backup, Recovery, Failure detection, and Repair for various popular databases on private and public clouds. The databases that KubeDB supports are MongoDB, Elasticsearch, MySQL, MariaDB, Kafka, Redis, PostgreSQL, ProxySQL, Percona XtraDB, Memcached and PgBouncer. You can find the guides to all the supported databases in KubeDB . In this tutorial we will show Horizontal scaling of MySQL cluster in Amazon Elastic Kubernetes Service (Amazon EKS). We will cover the following steps:
- Install KubeDB
- Deploy MySQL Cluster
- Read/Write Sample Data
- Horizontal Scaling of MySQL Cluster
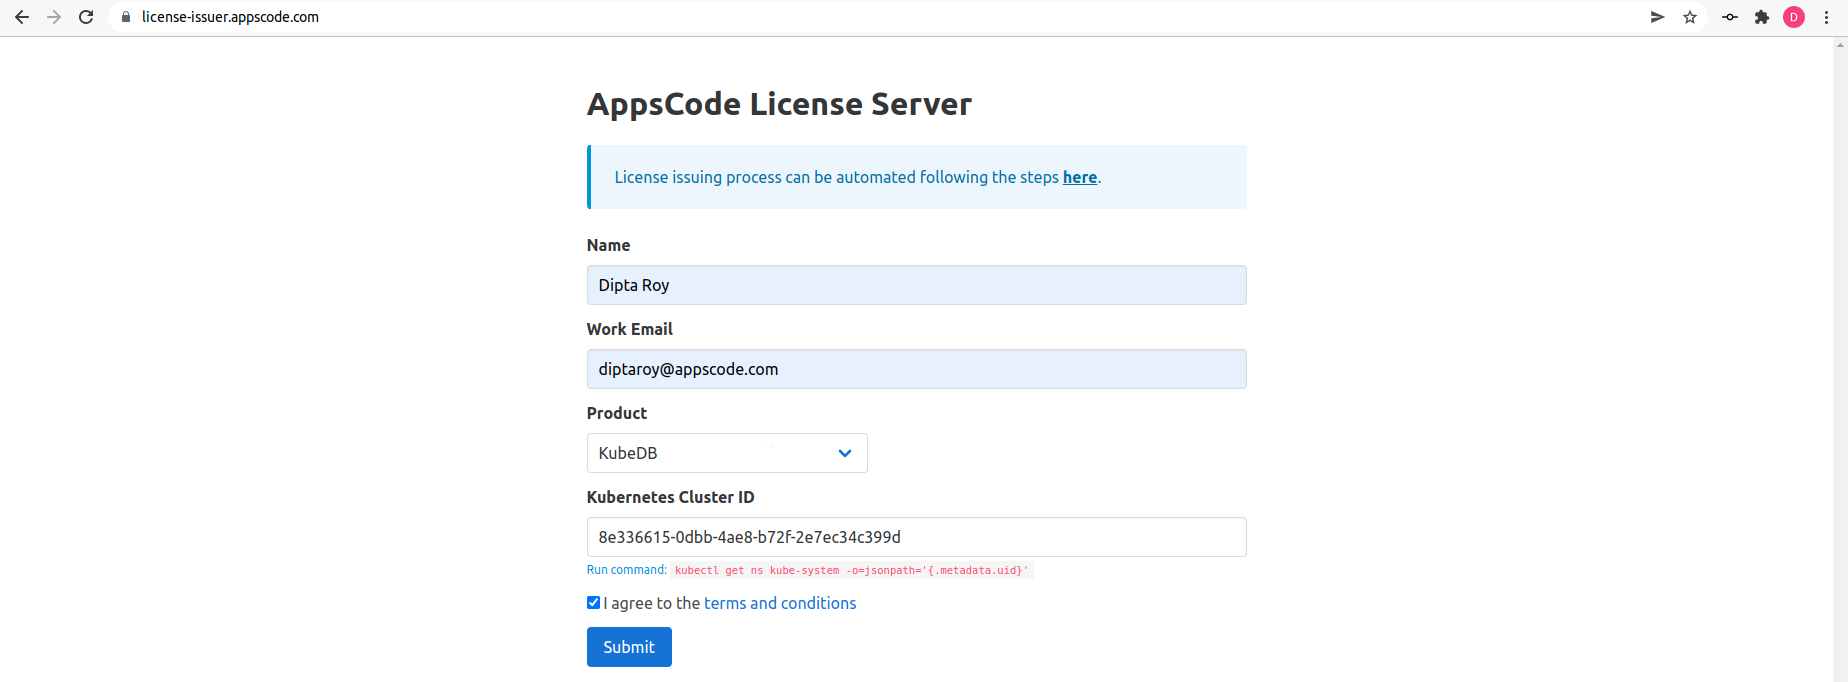
Get Cluster ID
We need the cluster ID to get the KubeDB License. To get cluster ID, we can run the following command:
$ kubectl get ns kube-system -o jsonpath='{.metadata.uid}'
8e336615-0dbb-4ae8-b72f-2e7ec34c399d
Get License
Go to Appscode License Server to get the license.txt file. For this tutorial we will use KubeDB.
Install KubeDB
We will use helm to install KubeDB. Please install helm here
if it is not already installed.
Now, let’s install KubeDB.
$ helm install kubedb oci://ghcr.io/appscode-charts/kubedb \
  --version v2023.12.21 \
  --namespace kubedb --create-namespace \
  --set-file global.license=/path/to/the/license.txt \
  --wait --burst-limit=10000 --debug

$ helm search repo appscode/kubedb
NAME                              	CHART VERSION	APP VERSION  	DESCRIPTION
appscode/kubedb                   	v2023.12.11  	v2023.12.11  	KubeDB by AppsCode - Production ready databases...
appscode/kubedb-autoscaler        	v0.23.0      	v0.23.0      	KubeDB Autoscaler by AppsCode - Autoscale KubeD...
appscode/kubedb-catalog           	v2023.12.11  	v2023.12.11  	KubeDB Catalog by AppsCode - Catalog for databa...
appscode/kubedb-community         	v0.24.2      	v0.24.2      	KubeDB Community by AppsCode - Community featur...
appscode/kubedb-crds              	v2023.12.11  	v2023.12.11  	KubeDB Custom Resource Definitions
appscode/kubedb-dashboard         	v0.14.0      	v0.14.0      	KubeDB Dashboard by AppsCode
appscode/kubedb-enterprise        	v0.11.2      	v0.11.2      	KubeDB Enterprise by AppsCode - Enterprise feat...
appscode/kubedb-grafana-dashboards	v2023.12.11  	v2023.12.11  	A Helm chart for kubedb-grafana-dashboards by A...
appscode/kubedb-kubestash-catalog 	v2023.12.11  	v2023.12.11  	KubeStash Catalog by AppsCode - Catalog of Kube...
appscode/kubedb-metrics           	v2023.12.11  	v2023.12.11  	KubeDB State Metrics
appscode/kubedb-one               	v2023.12.11  	v2023.12.11  	KubeDB and Stash by AppsCode - Production ready...
appscode/kubedb-ops-manager       	v0.25.0      	v0.25.0      	KubeDB Ops Manager by AppsCode - Enterprise fea...
appscode/kubedb-opscenter         	v2023.12.11  	v2023.12.11  	KubeDB Opscenter by AppsCode
appscode/kubedb-provider-aws      	v2023.12.11  	v0.0.2       	A Helm chart for KubeDB AWS Provider for Crossp...
appscode/kubedb-provider-azure    	v2023.12.11  	v0.0.2       	A Helm chart for KubeDB Azure Provider for Cros...
appscode/kubedb-provider-gcp      	v2023.12.11  	v0.0.2       	A Helm chart for KubeDB GCP Provider for Crossp...
appscode/kubedb-provisioner       	v0.38.0      	v0.38.1      	KubeDB Provisioner by AppsCode - Community feat...
appscode/kubedb-schema-manager    	v0.14.0      	v0.14.0      	KubeDB Schema Manager by AppsCode
appscode/kubedb-ui                	v2023.12.5   	0.6.1-alpha.2	A Helm chart for Kubernetes
appscode/kubedb-ui-server         	v2021.12.21  	v2021.12.21  	A Helm chart for kubedb-ui-server by AppsCode
appscode/kubedb-webhook-server    	v0.14.0      	v0.14.0      	KubeDB Webhook Server by AppsCode
Let’s verify the installation:
$ kubectl get pods --all-namespaces -l "app.kubernetes.io/instance=kubedb"
NAMESPACE   NAME                                            READY   STATUS    RESTARTS   AGE
kubedb      kubedb-kubedb-autoscaler-85cd95b566-s28kp       1/1     Running   0          86s
kubedb      kubedb-kubedb-dashboard-755cd987b9-qzrxw        1/1     Running   0          86s
kubedb      kubedb-kubedb-ops-manager-5f6554ff87-z76f4      1/1     Running   0          86s
kubedb      kubedb-kubedb-provisioner-7d96496655-rlthn      1/1     Running   0          86s
kubedb      kubedb-kubedb-schema-manager-75659b84bb-hwx6j   1/1     Running   0          86s
kubedb      kubedb-kubedb-webhook-server-ffd7d5659-ndr5d    1/1     Running   0          86s
We can list the CRD Groups that have been registered by the operator by running the following command:
$ kubectl get crd -l app.kubernetes.io/name=kubedb
NAME                                              CREATED AT
elasticsearchautoscalers.autoscaling.kubedb.com   2023-12-15T09:12:07Z
elasticsearchdashboards.dashboard.kubedb.com      2023-12-15T09:12:05Z
elasticsearches.kubedb.com                        2023-12-15T09:12:05Z
elasticsearchopsrequests.ops.kubedb.com           2023-12-15T09:12:17Z
elasticsearchversions.catalog.kubedb.com          2023-12-15T09:09:58Z
etcds.kubedb.com                                  2023-12-15T09:12:20Z
etcdversions.catalog.kubedb.com                   2023-12-15T09:09:59Z
kafkaopsrequests.ops.kubedb.com                   2023-12-15T09:13:10Z
kafkas.kubedb.com                                 2023-12-15T09:12:29Z
kafkaversions.catalog.kubedb.com                  2023-12-15T09:09:59Z
mariadbautoscalers.autoscaling.kubedb.com         2023-12-15T09:12:07Z
mariadbopsrequests.ops.kubedb.com                 2023-12-15T09:12:46Z
mariadbs.kubedb.com                               2023-12-15T09:12:21Z
mariadbversions.catalog.kubedb.com                2023-12-15T09:09:59Z
memcacheds.kubedb.com                             2023-12-15T09:12:21Z
memcachedversions.catalog.kubedb.com              2023-12-15T09:10:00Z
mongodbarchivers.archiver.kubedb.com              2023-12-15T09:12:33Z
mongodbautoscalers.autoscaling.kubedb.com         2023-12-15T09:12:07Z
mongodbopsrequests.ops.kubedb.com                 2023-12-15T09:12:21Z
mongodbs.kubedb.com                               2023-12-15T09:12:22Z
mongodbversions.catalog.kubedb.com                2023-12-15T09:10:00Z
mysqlautoscalers.autoscaling.kubedb.com           2023-12-15T09:12:07Z
mysqlopsrequests.ops.kubedb.com                   2023-12-15T09:12:42Z
mysqls.kubedb.com                                 2023-12-15T09:12:24Z
mysqlversions.catalog.kubedb.com                  2023-12-15T09:10:00Z
perconaxtradbautoscalers.autoscaling.kubedb.com   2023-12-15T09:12:07Z
perconaxtradbopsrequests.ops.kubedb.com           2023-12-15T09:13:03Z
perconaxtradbs.kubedb.com                         2023-12-15T09:12:24Z
perconaxtradbversions.catalog.kubedb.com          2023-12-15T09:10:01Z
pgbouncers.kubedb.com                             2023-12-15T09:12:26Z
pgbouncerversions.catalog.kubedb.com              2023-12-15T09:10:01Z
postgresarchivers.archiver.kubedb.com             2023-12-15T09:12:36Z
postgresautoscalers.autoscaling.kubedb.com        2023-12-15T09:12:08Z
postgreses.kubedb.com                             2023-12-15T09:12:27Z
postgresopsrequests.ops.kubedb.com                2023-12-15T09:12:55Z
postgresversions.catalog.kubedb.com               2023-12-15T09:10:01Z
proxysqlautoscalers.autoscaling.kubedb.com        2023-12-15T09:12:08Z
proxysqlopsrequests.ops.kubedb.com                2023-12-15T09:12:59Z
proxysqls.kubedb.com                              2023-12-15T09:12:27Z
proxysqlversions.catalog.kubedb.com               2023-12-15T09:10:01Z
publishers.postgres.kubedb.com                    2023-12-15T09:13:14Z
redisautoscalers.autoscaling.kubedb.com           2023-12-15T09:12:08Z
redises.kubedb.com                                2023-12-15T09:12:28Z
redisopsrequests.ops.kubedb.com                   2023-12-15T09:12:49Z
redissentinelautoscalers.autoscaling.kubedb.com   2023-12-15T09:12:09Z
redissentinelopsrequests.ops.kubedb.com           2023-12-15T09:13:06Z
redissentinels.kubedb.com                         2023-12-15T09:12:29Z
redisversions.catalog.kubedb.com                  2023-12-15T09:10:02Z
subscribers.postgres.kubedb.com                   2023-12-15T09:13:18Z
Deploy MySQL Cluster
We are going to Deploy MySQL Cluster using KubeDB. First, let’s create a Namespace in which we will deploy the database.
$ kubectl create namespace demo
namespace/demo created
Here is the yaml of the MySQL CR we are going to use:
apiVersion: kubedb.com/v1alpha2
kind: MySQL
metadata:
  name: mysql-cluster
  namespace: demo
spec:
  version: "8.1.0"
  replicas: 3
  topology:
    mode: GroupReplication
  storageType: Durable
  storage:
    storageClassName: "gp2"
    accessModes:
      - ReadWriteOnce
    resources:
      requests:
        storage: 1Gi
  terminationPolicy: WipeOut
Let’s save this yaml configuration into mysql-cluster.yaml
Then create the above MySQL CR
$ kubectl apply -f mysql-cluster.yaml
mysql.kubedb.com/mysql-cluster created
In this yaml,
- In this yaml we can see in the
spec.versionfield specifies the version of MySQL. Here, we are using MySQL8.1.0. You can list the KubeDB supported versions of MySQL by running$ kubectl get mysqlversionscommand. spec.topologyrepresents the clustering configuration for MySQL.spec.topology.modespecifies the mode for MySQL cluster. Here we have usedGroupReplication.spec.storage.storageClassNameis the name of the StorageClass used to provision PVCs.spec.terminationPolicyfield is Wipeout means that the database will be deleted without restrictions. It can also be “Halt”, “Delete” and “DoNotTerminate”. Learn More about these checkout Termination Policy .
Once these are handled correctly and the MySQL object is deployed, you will see that the following objects are created:
$ kubectl get all -n demo
NAME                  READY   STATUS    RESTARTS   AGE
pod/mysql-cluster-0   2/2     Running   0          4m
pod/mysql-cluster-1   2/2     Running   0          4m
pod/mysql-cluster-2   2/2     Running   0          3m

NAME                            TYPE        CLUSTER-IP     EXTERNAL-IP   PORT(S)    AGE
service/mysql-cluster           ClusterIP   10.44.22.110   <none>        3306/TCP   5m
service/mysql-cluster-pods      ClusterIP   None           <none>        3306/TCP   5m
service/mysql-cluster-standby   ClusterIP   10.44.19.195   <none>        3306/TCP   5m

NAME                             READY   AGE
statefulset.apps/mysql-cluster   3/3     5m

NAME                                               TYPE               VERSION   AGE
appbinding.appcatalog.appscode.com/mysql-cluster   kubedb.com/mysql   8.1.0     5m

NAME                             VERSION   STATUS   AGE
mysql.kubedb.com/mysql-cluster   8.1.0     Ready    5m
Let’s check if the database is ready to use,
$ kubectl get mysql -n demo mysql-cluster
NAME            VERSION   STATUS   AGE
mysql-cluster   8.1.0     Ready    6m
We have successfully deployed MySQL cluster in AWS. Now we can exec into the container to use the database.
Accessing Database Through CLI
To access the database through CLI, we have to get the credentials to access. KubeDB will create Secret and Service for the database mysql-cluster that we have deployed. Let’s check them using the following commands,
$ kubectl get secret -n demo -l=app.kubernetes.io/instance=mysql-cluster
NAME                 TYPE                       DATA   AGE
mysql-cluster-auth   kubernetes.io/basic-auth   2      16m

$ kubectl get service -n demo -l=app.kubernetes.io/instance=mysql-cluster
NAME                    TYPE        CLUSTER-IP     EXTERNAL-IP   PORT(S)    AGE
mysql-cluster           ClusterIP   10.44.22.110   <none>        3306/TCP   17m
mysql-cluster-pods      ClusterIP   None           <none>        3306/TCP   17m
mysql-cluster-standby   ClusterIP   10.44.19.195   <none>        3306/TCP   17m
Now, we are going to use mysql-cluster-auth to get the credentials.
$ kubectl get secrets -n demo mysql-cluster-auth -o jsonpath='{.data.username}' | base64 -d
root

$ kubectl get secrets -n demo mysql-cluster-auth -o jsonpath='{.data.password}' | base64 -d
ME2x7)YrLb4L!asY
Insert Sample Data
In this section, we are going to login into our MySQL database pod and insert some sample data.
$ kubectl exec -it mysql-cluster-0 -n demo -c mysql -- bash
bash-4.4# mysql --user=root --password='ME2x7)YrLb4L!asY'
Welcome to the MySQL monitor.  Commands end with ; or \g.
Your MySQL connection id is 384

Type 'help;' or '\h' for help. Type '\c' to clear the current input statement.

mysql> CREATE DATABASE Music;
Query OK, 1 row affected (0.01 sec)

mysql> CREATE TABLE Music.Artist (id INT(6) UNSIGNED AUTO_INCREMENT PRIMARY KEY, Name VARCHAR(50), Song VARCHAR(50));
Query OK, 0 rows affected, 1 warning (0.02 sec)

mysql> INSERT INTO Music.Artist (Name, Song) VALUES ("John Denver", "Annie's Song");
Query OK, 1 row affected (0.00 sec)

mysql> SELECT * FROM Music.Artist;
+----+-------------+---------------+
| id | Name        | Song          |
+----+-------------+---------------+
|  1 | John Denver | Annie's Song  |
+----+-------------+---------------+
1 row in set (0.00 sec)

mysql> exit
Bye
We’ve successfully inserted some sample data to our database. More information about Run & Manage MySQL on Kubernetes can be found in Kubernetes MySQL
Horizontal Scaling of MySQL Cluster
Horizontal Scale Up
Here, we are going to scale up the replicas of the MySQL cluster replicaset to meet the desired number of replicas after scaling. Before applying Horizontal Scaling, let’s check the current number of replicas,
$ kubectl get mysql -n demo mysql-cluster -o json | jq '.spec.replicas'
3
Create MySQLOpsRequest
In order to scale up, we have to create a MySQLOpsRequest CR with our desired replicas. Let’s create it using this following yaml,
apiVersion: ops.kubedb.com/v1alpha1
kind: MySQLOpsRequest
metadata:
  name: horizontal-scale-up
  namespace: demo
spec:
  type: HorizontalScaling
  databaseRef:
    name: mysql-cluster
  horizontalScaling:
    member: 5
In this yaml,
spec.databaseRef.namespecifies that we are performing horizontal scaling operation onmysql-clusterdatabase.spec.typespecifies that we are performingHorizontalScalingon our database.spec.horizontalScaling.memberspecifies the desired number of replicas after scaling.
Let’s save this yaml configuration into horizontal-scale-up.yaml and apply it,
$ kubectl apply -f horizontal-scale-up.yaml
mysqlopsrequest.ops.kubedb.com/horizontal-scale-up created
Let’s wait for MySQLOpsRequest STATUS to be Successful. Run the following command to watch MySQLOpsRequest CR,
$ watch kubectl get mysqlopsrequest -n demo
NAME                  TYPE                STATUS       AGE
horizontal-scale-up   HorizontalScaling   Successful   2m39s
From the above output we can see that the MySQLOpsRequest has succeeded. Now, we are going to verify the number of replicas,
$ kubectl get mysql -n demo mysql-cluster -o json | jq '.spec.replicas'
5
From all the above outputs we can see that the replicas of the cluster is now increased to 5. That means we have successfully scaled up the replicas of the MySQL cluster.
Horizontal Scale Down
Now, we are going to scale down the replicas of the cluster to meet the desired number of replicas after scaling.
Create MySQLOpsRequest
In order to scale down, again we need to create a MySQLOpsRequest CR with our desired replicas. Let’s create it using this following yaml,
apiVersion: ops.kubedb.com/v1alpha1
kind: MySQLOpsRequest
metadata:
  name: horizontal-scale-down
  namespace: demo
spec:
  type: HorizontalScaling
  databaseRef:
    name: mysql-cluster
  horizontalScaling:
    member: 3
In this yaml,
spec.databaseRef.namespecifies that we are performing horizontal scaling operation onmysql-clusterdatabase.spec.typespecifies that we are performingHorizontalScalingon our database.spec.horizontalScaling.memberspecifies the desired number of replicas after scaling.
Let’s save this yaml configuration into horizontal-scale-down.yaml and apply it,
$ kubectl apply -f horizontal-scale-down.yaml
mysqlopsrequest.ops.kubedb.com/horizontal-scale-down created
Let’s wait for MySQLOpsRequest STATUS to be Successful. Run the following command to watch MySQLOpsRequest CR,
$ watch kubectl get mysqlopsrequest -n demo
NAME                    TYPE                STATUS       AGE
horizontal-scale-down   HorizontalScaling   Successful   2m18s
From the above output we can see that the MySQLOpsRequest has succeeded. Now, we are going to verify the number of replicas,
$ kubectl get mysql -n demo mysql-cluster -o json | jq '.spec.replicas'
3
From all the above outputs we can see that the replicas of the cluster is decreased to 3. That means we have successfully scaled down the replicas of the MySQL cluster.
If you want to learn more about Production-Grade MySQL on Kubernetes you can have a look into that playlist below:
Support
To speak with us, please leave a message on our website .
To receive product announcements, follow us on Twitter/X .
To watch tutorials of various Production-Grade Kubernetes Tools Subscribe our YouTube channel.
More about MySQL in Kubernetes
If you have found a bug with KubeDB or want to request for new features, please file an issue .