


PITR using NFS server as a backend
Overview
KubeDB is the Kubernetes Native Database Management Solution which simplifies and automates routine database tasks such as Provisioning, Monitoring, Upgrading, Patching, Scaling, Volume Expansion, Backup, Recovery, Failure detection, and Repair for various popular databases on private and public clouds. The databases that KubeDB supports are MongoDB, Elasticsearch, MySQL, Kafka, MariaDB, Redis, PostgreSQL, ProxySQL, Percona XtraDB, Memcached and PgBouncer. You can find the guides to all the supported databases in KubeDB . In this tutorial we will use NFS server as a storage backend to perform Point In Time Recovery for Postgresql database.
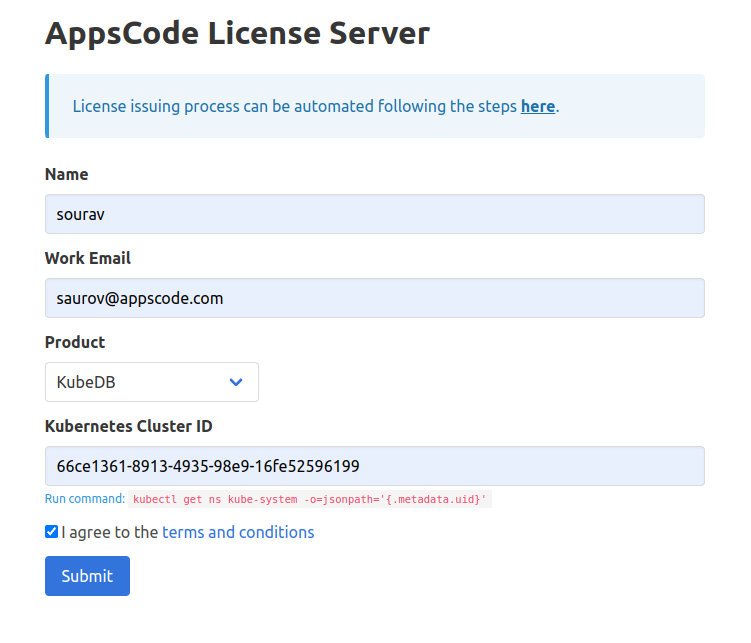
Before begin, we need to get a license for Kubedb products.
Get Cluster ID
We need the cluster ID to get the KubeDB License. To get cluster ID we can run the following command:
$ kubectl get ns kube-system -o jsonpath='{.metadata.uid}'
60b010fb-9ad6-4ac6-89f4-7321e697f469
Get License
Go to Appscode License Server to get the license.txt file. For this tutorial we will use KubeDB Enterprise Edition.
As we have license, now we will follow this to install the necessary tools for performing PITR.
Install Sidekick
helm pull oci://ghcr.io/appscode-charts/sidekick --version v2023.12.11
helm upgrade -i sidekick sidekick-v2023.12.11.tgz \
  -n kubedb --create-namespace \
  --wait --burst-limit=10000 --debug

Install KubeStash
helm pull oci://ghcr.io/appscode-charts/kubestash --version v2023.12.28
Please provide the license that you have downloaded earlier here
--set-file global.license=
helm upgrade -i kubestash kubestash-v2023.12.28.tgz \
  --namespace kubedb \
  --set kubedb-kubestash-catalog.enabled=true \

  --set-file global.license=$HOME/Downloads/kubedb-license-6352bd41-0d2d-4824-a70c-cd038fe8292d.txt \
  --wait --burst-limit=10000 --debug

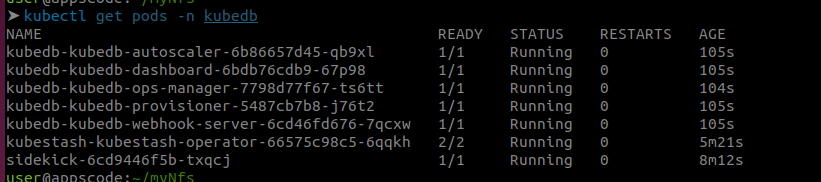
Install Kubedb
Uninstall kubedb if already kubedb relase exists.
helm uninstall kubedb -n kubedb
helm pull oci://ghcr.io/appscode-charts/kubedb --version v2023.12.28
Apply the crds.
kubectl apply -f https://github.com/kubedb/installer/raw/v2023.12.28/crds/kubedb-catalog-crds.yaml
Please provide the license that you have downloaded earlier here
--set-file global.license=
helm upgrade -i kubedb kubedb-v2023.12.28.tgz \
  --namespace kubedb \
  --set kubedb-kubestash-catalog.enabled=true \
  --set-file global.license=$HOME/Downloads/kubedb-license-6352bd41-0d2d-4824-a70c-cd038fe8292d.txt \
  --wait --burst-limit=10000 --debug
Install Longhorn
Longhorn is a distributed block storage system for Kubernetes that manages persistent storage.
Add Longhorn chart repository.
helm repo add longhorn https://charts.longhorn.io
Update local Longhorn chart information from chart repository.
helm repo update
Install Longhorn chart.
With Helm 2, the following command will create the longhorn-system namespace and install the Longhorn chart together.
helm install longhorn/longhorn --name longhorn --namespace longhorn-system
With Helm 3, the following commands will create the longhorn-system namespace first, then install the Longhorn chart.
kubectl create namespace longhorn-system
helm install longhorn longhorn/longhorn --namespace longhorn-system
Install External Snapshotter
CSI (Container Storage Interface) external snapshotter is a component used in Kubernetes for managing volume snapshots. It allows external storage systems (such as Longhorn) to integrate with Kubernetes Volume Snapshot feature.
clone https://github.com/kubernetes-csi/external-snapshotter/tree/release-5.0
or
wget https://github.com/kubernetes-csi/external-snapshotter/archive/refs/tags/v5.0.1.zip
unzip v5.0.1.zip
cd external-snapshotter-5.0.1

kubectl kustomize client/config/crd | kubectl create -f -
kubectl -n kube-system kustomize deploy/kubernetes/snapshot-controller | kubectl create -f -
kubectl kustomize deploy/kubernetes/csi-snapshotter | kubectl create -f -
Create volumeSnapshotClass
Apply this yaml to create a volumeSnapShotClass. This will be used to create volume snapshot.
apiVersion: snapshot.storage.k8s.io/v1
kind: VolumeSnapshotClass
metadata:
  name: longhorn-vsc
driver: driver.longhorn.io
deletionPolicy: Delete
parameters:
  type: snap
Install CSI driver for NFS
Install CSI driver for creating nfs volume from here .
helm repo add csi-driver-nfs https://raw.githubusercontent.com/kubernetes-csi/csi-driver-nfs/master/charts
helm install csi-driver-nfs csi-driver-nfs/csi-driver-nfs --namespace kube-system --version v4.5.0 --set feature.enableFSGroupPolicy=true
Be aware to set --set feature.enableFSGroupPolicy=true this.
We will use namespace demo throughout this tutorial.
➤ kubectl create ns demo
namespace/demo created
Setup NFS Server
We will deploy a nfs server and a service using the below yamls. Note we have shared /exports path.
apiVersion: apps/v1
kind: Deployment
metadata:
  name: nfs-server
  namespace: demo
spec:
  selector:
    matchLabels:
      app: nfs-server
  template:
    metadata:
      labels:
        app: nfs-server
    spec:
      containers:
        - name: nfs-server
          image: k8s.gcr.io/volume-nfs:0.8
          ports:
            - name: nfs
              containerPort: 2049
            - name: mountd
              containerPort: 20048
            - name: rpcbind
              containerPort: 111
          securityContext:
            privileged: true
          volumeMounts:
            - name: storage
              mountPath: /exports
      volumes:
        - name: storage
          hostPath:
            path: /data/nfs # store all data in "/data/nfs" directory of the node where it is running
            type: DirectoryOrCreate
---

apiVersion: v1
kind: Service
metadata:
  name: nfs-server
  namespace: demo
spec:
  ports:
    - name: nfs
      port: 2049
    - name: mountd
      port: 20048
    - name: rpcbind
      port: 111
  selector:
    app: nfs-server # must match with the label of NFS pod
➤ kubectl apply -f nfs-server.yaml
deployment.apps/nfs-server created
service/nfs-server created
nfs server should be running inside this pod

Create StorageClass for NFS
allowVolumeExpansion: true
apiVersion: storage.k8s.io/v1
kind: StorageClass
metadata:
  name: nfs
parameters:
  server: nfs-server.demo.svc.cluster.local
  share: /
provisioner: nfs.csi.k8s.io
reclaimPolicy: Delete
volumeBindingMode: Immediate
Here, parameters.server should be the dns name of your service that is created along with nfs server, parameters.share should be the path inside the shared directory.
Create BackupStorage
First create a PVC which we will use as our backend storage. This pvc should be created using nfs storageClass that we have created earlier.
apiVersion: v1
kind: PersistentVolumeClaim
metadata:
  name: nfs-pvc
  namespace: demo
spec:
  storageClassName: "nfs"
  resources:
    requests:
      storage: 1Gi
  accessModes:
    - ReadWriteOnce
create a encryption secret.
EncryptionSecret refers to the Secret containing the encryption key which will be used to encode/decode the backed up data. You can refer to a Secret of a different namespace.
apiVersion: v1
kind: Secret
type: Opaque
metadata:
  name: encrypt-secret
  namespace: demo
stringData:
  RESTIC_PASSWORD: "changeit"
create a retention policy.
apiVersion: storage.kubestash.com/v1alpha1
kind: RetentionPolicy
metadata:
  name: postgres-retention-policy
  namespace: demo
spec:
  maxRetentionPeriod: "30d"
  successfulSnapshots:
    last: 100
  failedSnapshots:
    last: 2
Now we create the backupStorage following way.
apiVersion: storage.kubestash.com/v1alpha1
kind: BackupStorage
metadata:
  name: local-storage
  namespace: demo
spec:
  storage:
    provider: local
    local:
      mountPath: /pg/walg
      persistentVolumeClaim:
        claimName: nfs-pvc
  usagePolicy:
    allowedNamespaces:
      from: All
  default: false
  deletionPolicy: WipeOut
  runtimeSettings:
    pod:
      securityContext:
        fsGroup: 70
        runAsUser: 70
Create Postgres-Archiver
Apply the following yaml to create a Postgres-Archiver.
apiVersion: archiver.kubedb.com/v1alpha1
kind: PostgresArchiver
metadata:
  name: pg-archiver
  namespace: demo
spec:
  pause: false
  databases:
    namespaces:
      from: Selector
      selector:
        matchLabels:
         kubernetes.io/metadata.name: demo
    selector:
      matchLabels:
        archiver: "true"
  retentionPolicy:
    name: postgres-retention-policy
    namespace: demo
  encryptionSecret:
    name: "encrypt-secret"
    namespace: "demo"
  fullBackup:
    jobTemplate:
      spec:
        securityContext:
          fsGroup: 70
          runAsUser: 70
    driver: "VolumeSnapshotter"
    task:
      params:
        volumeSnapshotClassName: "longhorn-vsc"
    scheduler:
      successfulJobsHistoryLimit: 1
      failedJobsHistoryLimit: 1
      schedule: "30 3 * * *"
    sessionHistoryLimit: 2
  manifestBackup:
    jobTemplate:
      spec:
        securityContext:
          fsGroup: 70
          runAsUser: 70
    scheduler:
      successfulJobsHistoryLimit: 1
      failedJobsHistoryLimit: 1
      schedule: "30 3 * * *"
    sessionHistoryLimit: 2
  backupStorage:
    ref:
      name: "local-storage"
      namespace: "demo"
Create Postgres
apiVersion: kubedb.com/v1alpha2
kind: Postgres
metadata:
  name: ha-postgres
  namespace: demo
  labels:
    archiver: "true"
spec:
  version: "16.1"
  replicas: 2
  standbyMode: Hot
  storageType: Durable
  storage:
    storageClassName: "longhorn"
    accessModes:
    - ReadWriteOnce
    resources:
      requests:
        storage: 1Gi
  archiver:
    ref:
      name: pg-archiver
      namespace: demo
  terminationPolicy: WipeOut
Database Pods and backup pods. A initial backup is taken when database is ready.
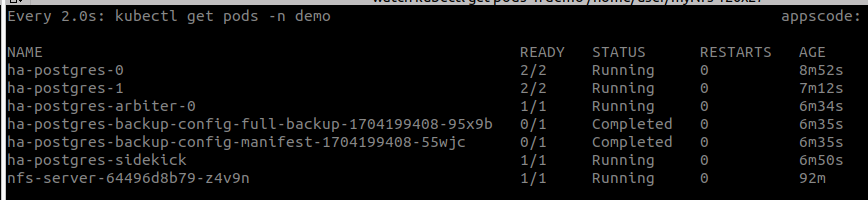
Now lets exec into the nfs server pod to see if the data is there.

Restore
First insert some data in your postgres. We used this cli to insert data into postgres.
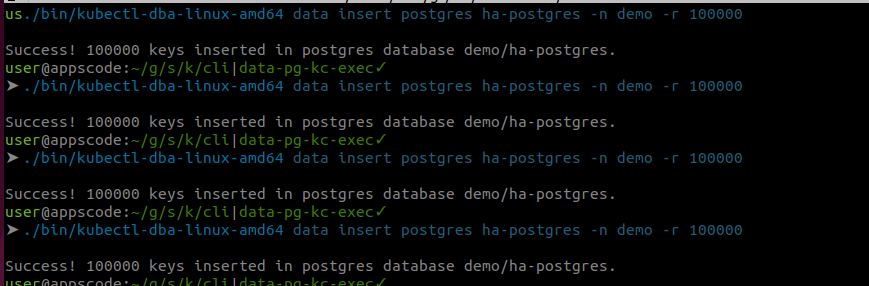
We have inserted 400000 rows.
Now we need to get current time as recoveryTimeStamp and perform a pg_switch_wal if we are immediately trying to restore after insert. Note this is not necessary for other cases.
➤ kubectl exec -it -n demo ha-postgres-0 -- bash
ha-postgres-0:/$ psql -c "select now();"
              now
-------------------------------
 2024-01-02 13:19:36.852475+00
(1 row)

ha-postgres-0:/$ psql -c "select pg_switch_wal()";
pg_switch_wal
---------------
 0/800B710
(1 row)
Now create a recovery postgres like below. Make sure you change the recoveryTimeStamp.
See spec.init.archiver.recoveryTimeStamp for the format. Once you have changed the spec.init.archiver.recoveryTimeStamp field, apply the yaml.
apiVersion: kubedb.com/v1alpha2
kind: Postgres
metadata:
  name: restore-postgres
  namespace: demo
spec:
  init:
    archiver:
      encryptionSecret:
        name: encrypt-secret
        namespace: demo
      fullDBRepository:
        name: ha-postgres-repository
        namespace: demo
      recoveryTimestamp: "2024-01-02T13:19:36.852475Z"
  version: "16.1"
  replicas: 3
  standbyMode: Hot
  storageType: Durable
  storage:
    storageClassName: "longhorn"
    accessModes:
    - ReadWriteOnce
    resources:
      requests:
        storage: 1Gi
  terminationPolicy: WipeOut
It will run few restore job and then create desired replicas of database pod.

Now we verify if the database has 400000 rows.
