


Overview
The databases that KubeDB support are MongoDB, Elasticsearch, MySQL, MariaDB, PostgreSQL, Memcached and Redis. You can find the guides to all the supported databases here . In this tutorial we will deploy MongoDB database. We will cover the following steps:
- Install KubeDB
- Deploy Standalone Database
- Install Stash
- Backup Using Stash
- Recover Using Stash
Install KubeDB
We will follow the following steps to install KubeDB.
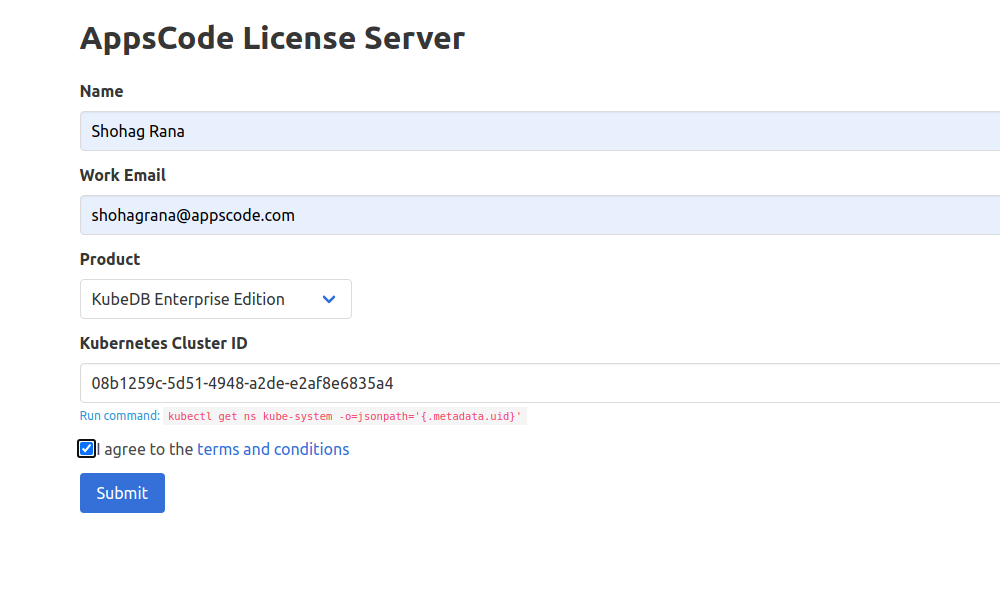
Step 1: Get Cluster ID
We need the cluster ID to get the KubeDB License. To get cluster ID we can run the following command:
$ kubectl get ns kube-system -o=jsonpath='{.metadata.uid}'
08b1259c-5d51-4948-a2de-e2af8e6835a4
Step 2: Get License
Go to Appscode License Server to get the license.txt file. For this tutorial we will use KubeDB Enterprise Edition.
Step 3: Install KubeDB
We will use helm to install KubeDB. Please install helm here
if it is not already installed.
Now, let’s install KubeDB.
$ helm repo add appscode https://charts.appscode.com/stable/
$ helm repo update

$ helm search repo appscode/kubedb
NAME                        CHART VERSION APP VERSION DESCRIPTION
appscode/kubedb             v2021.06.23   v2021.06.23 KubeDB by AppsCode - Production ready databases...
appscode/kubedb-autoscaler  v0.4.0        v0.4.0      KubeDB Autoscaler by AppsCode - Autoscale KubeD...
appscode/kubedb-catalog     v0.19.0       v0.19.0     KubeDB Catalog by AppsCode - Catalog for databa...
appscode/kubedb-community   v0.19.0       v0.19.0     KubeDB Community by AppsCode - Community featur...
appscode/kubedb-crds        v0.19.0       v0.19.0     KubeDB Custom Resource Definitions
appscode/kubedb-enterprise  v0.6.0        v0.6.0      KubeDB Enterprise by AppsCode - Enterprise feat...

# Install KubeDB Enterprise operator chart
$ helm install kubedb appscode/kubedb \
    --version v2021.06.23 \
    --namespace kube-system \
    --set-file global.license=/path/to/the/license.txt \
    --set kubedb-enterprise.enabled=true \
    --set kubedb-autoscaler.enabled=true
Let’s verify the installation:
$ watch kubectl get pods --all-namespaces -l "app.kubernetes.io/instance=kubedb"

NAMESPACE     NAME                                        READY   STATUS    RESTARTS   AGE
kube-system   kubedb-kubedb-autoscaler-5f8c566d5c-lcjdl   1/1     Running   0          2m42s
kube-system   kubedb-kubedb-community-74549c9b9d-9zks9    1/1     Running   0          2m42s
kube-system   kubedb-kubedb-enterprise-6c9dd8958-8tk4b    1/1     Running   0          2m42s
We can see the CRD Groups that have been registered by the operator by running the following command:
$ kubectl get crd -l app.kubernetes.io/name=kubedb
NAME                                              CREATED AT
elasticsearchautoscalers.autoscaling.kubedb.com   2021-07-12T06:51:39Z
elasticsearches.kubedb.com                        2021-07-12T06:51:44Z
elasticsearchopsrequests.ops.kubedb.com           2021-07-12T06:51:44Z
elasticsearchversions.catalog.kubedb.com          2021-07-12T06:49:59Z
etcds.kubedb.com                                  2021-07-12T06:51:54Z
etcdversions.catalog.kubedb.com                   2021-07-12T06:49:59Z
mariadbopsrequests.ops.kubedb.com                 2021-07-12T06:52:05Z
mariadbs.kubedb.com                               2021-07-12T06:51:55Z
mariadbversions.catalog.kubedb.com                2021-07-12T06:50:00Z
memcacheds.kubedb.com                             2021-07-12T06:51:55Z
memcachedversions.catalog.kubedb.com              2021-07-12T06:50:00Z
mongodbautoscalers.autoscaling.kubedb.com         2021-07-12T06:51:36Z
mongodbopsrequests.ops.kubedb.com                 2021-07-12T06:51:49Z
mongodbs.kubedb.com                               2021-07-12T06:51:49Z
mongodbversions.catalog.kubedb.com                2021-07-12T06:50:00Z
mysqlopsrequests.ops.kubedb.com                   2021-07-12T06:52:00Z
mysqls.kubedb.com                                 2021-07-12T06:51:59Z
mysqlversions.catalog.kubedb.com                  2021-07-12T06:50:01Z
perconaxtradbs.kubedb.com                         2021-07-12T06:52:00Z
perconaxtradbversions.catalog.kubedb.com          2021-07-12T06:50:01Z
pgbouncers.kubedb.com                             2021-07-12T06:51:54Z
pgbouncerversions.catalog.kubedb.com              2021-07-12T06:50:01Z
postgreses.kubedb.com                             2021-07-12T06:52:02Z
postgresopsrequests.ops.kubedb.com                2021-07-12T06:52:15Z
postgresversions.catalog.kubedb.com               2021-07-12T06:50:02Z
proxysqls.kubedb.com                              2021-07-12T06:52:03Z
proxysqlversions.catalog.kubedb.com               2021-07-12T06:50:02Z
redises.kubedb.com                                2021-07-12T06:52:03Z
redisopsrequests.ops.kubedb.com                   2021-07-12T06:52:09Z
redisversions.catalog.kubedb.com                  2021-07-12T06:50:02Z
Deploy Standalone Database
Now we are going to Install MongoDB with the help of KubeDB. At first, let’s create a Namespace in which we will deploy the database.
$ kubectl create ns demo
namespace/demo created
Here is the yaml of the MongoDB CRD we are going to use:
apiVersion: kubedb.com/v1alpha2
kind: MongoDB
metadata:
  name: mgo-quickstart
  namespace: demo
spec:
  version: "4.2.3"
  storageType: Durable
  storage:
    accessModes:
    - ReadWriteOnce
    resources:
      requests:
        storage: 1Gi
  terminationPolicy: WipeOut
Let’s save this yaml configuration into mongodb.yaml. Then apply using the command
kubectl apply -f mongodb.yaml
- In this yaml we can see in the
spec.versionfield the version of MongoDB. You can change and get updated version by runningkubectl get mongodbversionscommand. - Another field to notice is the
spec.storageTypefield. This can beDurableorEphemeraldepending on the requirements of the database to be persistent or not. - Lastly, the
spec.terminationPolicyfield is Wipeout means that the database will be deleted without restrictions. It can also be “Halt”, “Delete” and “DoNotTerminate”. Learn More about these HERE .
Once these are handled correctly and the MongoDB object is deployed you will see that the following are created:
$ kubectl get all -n demo
NAME                   READY   STATUS    RESTARTS   AGE
pod/mgo-quickstart-0   1/1     Running   0          96s

NAME                          TYPE        CLUSTER-IP     EXTERNAL-IP   PORT(S)     AGE
service/mgo-quickstart        ClusterIP   10.112.0.106   <none>        27017/TCP   98s
service/mgo-quickstart-pods   ClusterIP   None           <none>        27017/TCP   98s

NAME                              READY   AGE
statefulset.apps/mgo-quickstart   1/1     99s

NAME                                                TYPE                 VERSION   AGE
appbinding.appcatalog.appscode.com/mgo-quickstart   kubedb.com/mongodb   4.2.3     59s

NAME                                VERSION   STATUS   AGE
mongodb.kubedb.com/mgo-quickstart   4.2.3     Ready    103s
We have successfully deployed MongoDB in GKE. Now we can exec into the container to use the database. Please note that KubeDB operator has created a new Secret called
mgo-quickstart-authfor storing the password formongodbsuperuser. This secret contains ausernamekey which contains the username for MongoDB superuser and a password key which contains thepasswordfor MongoDB superuser.
Accessing Database Through CLI
To access the database through CLI we have to exec into the container:
$ kubectl  get secrets -n demo mgo-quickstart-auth -o jsonpath='{.data.\username}' | base64 -d
root
$ kubectl  get secrets -n demo mgo-quickstart-auth -o jsonpath='{.data.\password}' | base64 -d
v!Mc3W05a*(h0)Dp
$ kubectl exec -it mgo-quickstart-0 -n demo sh
kubectl exec [POD] [COMMAND] is DEPRECATED and will be removed in a future version. Use kubectl exec [POD] -- [COMMAND] instead.
#
Then to login into MongoDB:
# mongo admin
MongoDB shell version v4.2.3
connecting to: mongodb://127.0.0.1:27017/admin?compressors=disabled&gssapiServiceName=mongodb
Implicit session: session { "id" : UUID("843fa0a7-d675-4181-9c95-64e234ea6258") }
MongoDB server version: 4.2.3
Welcome to the MongoDB shell.
For interactive help, type "help".
For more comprehensive documentation, see
	http://docs.mongodb.org/
Questions? Try the support group
	http://groups.google.com/group/mongodb-user
> db.auth("root","v!Mc3W05a*(h0)Dp")
1
Now we have entered into the MongoDB CLI and we can create and delete as we want.
Let’s create a database called testdb and create a test collection called movie:
> show dbs
admin   0.000GB
config  0.000GB
local   0.000GB
> use testdb
switched to db testdb
> db.movie.insert({"name":"batman"});
WriteResult({ "nInserted" : 1 })
> db.movie.find().pretty()
{ "_id" : ObjectId("60daad277430604624c4159e"), "name" : "batman" }
> exit
bye
This was just one example of database deployment. The other databases that KubeDB support are MySQL, Postgres, Elasticsearch, MariaDB and Redis. The tutorials on how to deploy these into the cluster can be found HERE
Backup MongoDB Database Using Stash
Here we are going to backup the database we deployed before using Stash.
Step 1: Install Stash
Here we will use the KubeDB license we obtained earlier.
$ helm install stash appscode/stash             \
  --version v2021.06.23                  \
  --namespace kube-system                       \
  --set features.enterprise=true                \
  --set-file global.license=/path/to/the/license.txt
Let’s verify the installation:
~ $ kubectl get pods --all-namespaces -l app.kubernetes.io/name=stash-enterprise --watch
NAMESPACE     NAME                                      READY   STATUS    RESTARTS   AGE
kube-system   stash-stash-enterprise-6979884d85-7hdfm   0/2     Pending   0          0s
kube-system   stash-stash-enterprise-6979884d85-7hdfm   0/2     Pending   0          0s
kube-system   stash-stash-enterprise-6979884d85-7hdfm   0/2     ContainerCreating   0          0s
kube-system   stash-stash-enterprise-6979884d85-7hdfm   2/2     Running             0          11s
Step 2: Prepare Backend
Stash supports various backends for storing data snapshots. It can be a cloud storage like GCS bucket, AWS S3, Azure Blob Storage etc. or a Kubernetes persistent volume like HostPath, PersistentVolumeClaim, NFS etc.
For this tutorial we are going to use gcs-bucket. You can find other setups here .
At first we need to create a secret so that we can access the gcs bucket. We can do that by the following code:
$ echo -n 'YOURPASSWORD' > RESTIC_PASSWORD
$ echo -n 'YOURPROJECTNAME' > GOOGLE_PROJECT_ID
$ cat /PATH/TO/JSONKEY.json > GOOGLE_SERVICE_ACCOUNT_JSON_KEY
$ kubectl create secret generic -n demo gcs-secret \
        --from-file=./RESTIC_PASSWORD \
        --from-file=./GOOGLE_PROJECT_ID \
        --from-file=./GOOGLE_SERVICE_ACCOUNT_JSON_KEY
Step 3: Create Repository
apiVersion: stash.appscode.com/v1alpha1
kind: Repository
metadata:
name: gcs-repo
namespace: demo
spec:
backend:
gcs:
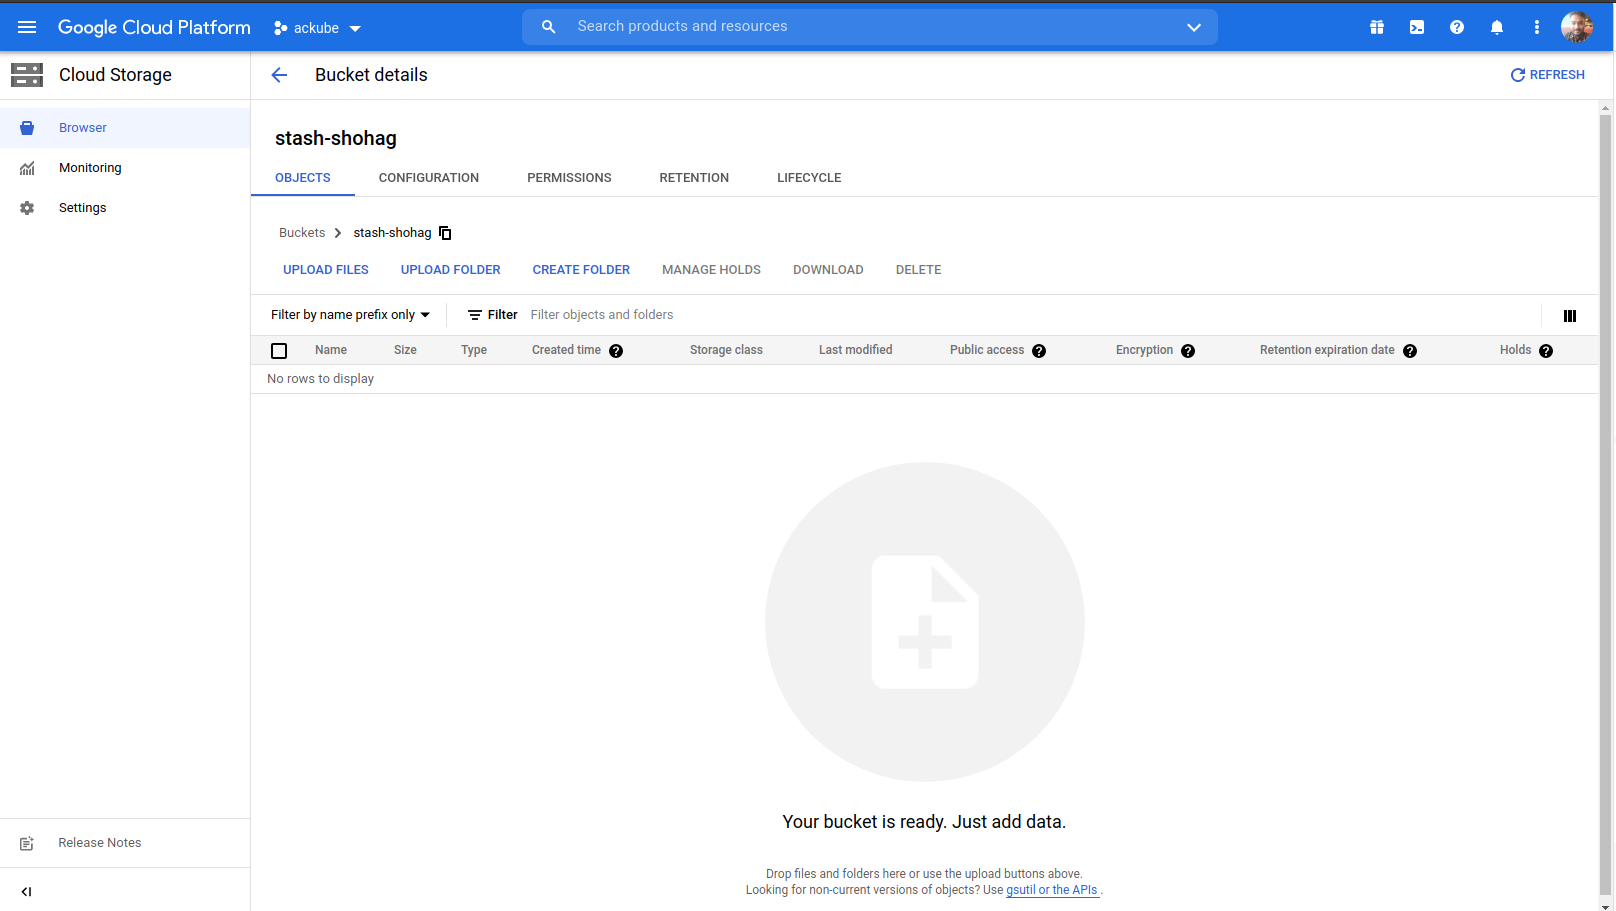
bucket: stash-shohag
prefix: /demo/mongoDB/sample-mongo
storageSecretName: gcs-secret
This repository CRD specifies the gcs-secret we created before and stores the name and path to the gcs-bucket. It also specifies the location in the bucket where we want to backup our database.
My bucket name is stash-shohag. Don’t forget to change
spec.backend.gcs.bucketto your bucket name.
Step 4: Create BackupConfiguration
Now we need to create a BackupConfiguration file that specifies what to backup, where to backup and when to backup.
apiVersion: stash.appscode.com/v1beta1
kind: BackupConfiguration
metadata:
  name: sample-mongodb-backup
  namespace: demo
spec:
  schedule: "*/5 * * * *"
  repository:
    name: gcs-repo
  target:
    ref:
      apiVersion: appcatalog.appscode.com/v1alpha1
      kind: AppBinding
      name: mgo-quickstart
  retentionPolicy:
    name: keep-last-5
    keepLast: 5
    prune: true
- BackupConfiguration creates a cronjob that backs up the specified database (
spec.target) every 5 minutes. spec.repositorycontaiins the secret we created before calledgcs-secret.spec.target.refcontains the reference to the appbinding that we want to backup. So, after 5 minutes we can see the following status:
$ kubectl get backupsession -n demo
NAME                               INVOKER-TYPE          INVOKER-NAME            PHASE       AGE
sample-mongodb-backup-1624944608   BackupConfiguration   sample-mongodb-backup   Succeeded   55s

$ kubectl get repository -n demo
NAME       INTEGRITY   SIZE        SNAPSHOT-COUNT   LAST-SUCCESSFUL-BACKUP   AGE
gcs-repo   true        1.997 KiB   1                3m15s                    7m34s
Now if we check our GCS bucket we can see that the backup has been successful.

If you have reached here, CONGRATULATIONS!! 🎊 🥳 🎊 You have successfully backed up MongoDB using Stash. If you had any problem during the backup process, you can reach out to us via EMAIL .
Recover MongoDB Database Using Stash
Let’s think of a scenario in which the database has been accidentally deleted or there was an error in the database causing it to crash. In such a case, we have to pause the BackupConfiguration so that the failed/damaged database does not get backed up into the cloud:
kubectl patch backupconfiguration -n demo sample-mongodb-backup --type="merge" --patch='{"spec": {"paused": true}}'
At first let’s simulate accidental database deletion.
$ kubectl exec -it mgo-quickstart-0 -n demo sh
kubectl exec [POD] [COMMAND] is DEPRECATED and will be removed in a future version. Use kubectl exec [POD] -- [COMMAND] instead.
# mongo admin
MongoDB shell version v4.2.3
connecting to: mongodb://127.0.0.1:27017/admin?compressors=disabled&gssapiServiceName=mongodb
Implicit session: session { "id" : UUID("2bdfd985-3adb-4ea9-aab5-8b9e7de935ee") }
MongoDB server version: 4.2.3
> db.auth("root","v!Mc3W05a*(h0)Dp")
1
> show dbs
admin   0.000GB
config  0.000GB
local   0.000GB
testdb  0.000GB
> use testdb
switched to db testdb
> db.dropDatabase()
{ "dropped" : "testdb", "ok" : 1 }
> show dbs
admin   0.000GB
config  0.000GB
local   0.000GB
Step 1: Create a RestoreSession
Now, let’s create a RestoreSession that will initiate restoring from the cloud.
apiVersion: stash.appscode.com/v1beta1
kind: RestoreSession
metadata:
  name: sample-mongodb-restore
  namespace: demo
spec:
  repository:
    name: gcs-repo
  target:
    ref:
      apiVersion: appcatalog.appscode.com/v1alpha1
      kind: AppBinding
      name: mgo-quickstart
  rules:
    - snapshots: [latest]
This RestoreSession specifies where the data will be restored. Once this is applied, a RestoreSession will be created. Once it has succeeded, the database has been successfully recovered as you can see below:
$ kubectl get restoresession -n demo
NAME                     REPOSITORY   PHASE       AGE
sample-mongodb-restore   gcs-repo     Succeeded   10s
Now let’s check whether the database has been correctly restored:
> show dbs
admin   0.000GB
config  0.000GB
local   0.000GB
testdb  0.000GB
> db.movie.find().pretty()
{ "_id" : ObjectId("60daad277430604624c4159e"), "name" : "batman" }
The recovery has been successful. If you faced any difficulties in the recovery process, you can reach out to us through EMAIL .
We have made an in depth video on how to run production-grade MongoDB in Kubernetes cluster using KubeDB. You can have a look into the video below:
Support
To speak with us, please leave a message on our website .
To receive product announcements, follow us on Twitter .
If you have found a bug with KubeDB or want to request for new features, please file an issue .