


Overview
KubeVault is a Git-Ops ready, production-grade solution for deploying and configuring Hashicorp’s Vault on Kubernetes. KubeVault provides various ways to configure your Vault deployment. You can pick your preferred Storage Backend, Unsealer Mode, TLS Mode, Secret Engines that you want to allow to attach with this VaultServer, Termination Policy to prevent accidental deletion or clean-up Vault deployment in a systematic way, Monitoring, etc. You can find the guides and detailed information in KubeVault Documentation . In this tutorial, we will show how to Manage Redis Secret Engine using KubeVault in Amazon Elastic Kubernetes Service (Amazon EKS). We will cover the following steps:
- Install KubeDB
- Install KubeVault
- Deploy Vault Server
- Deploy Redis Standalone Database
- Manage User Privileges
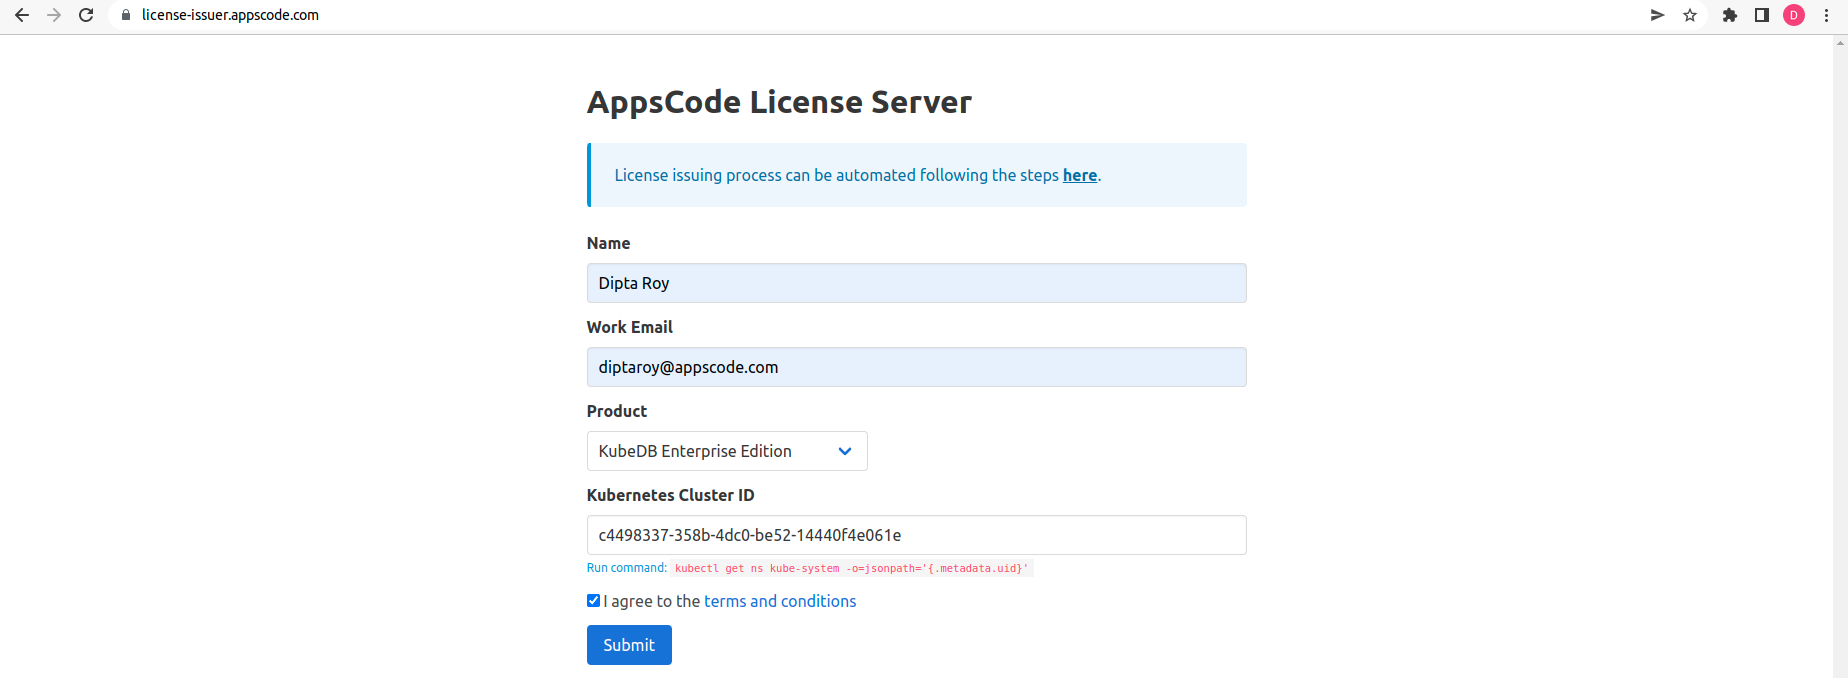
Get Cluster ID
We need the cluster ID to get the KubeDB and KubeVault License. To get cluster ID we can run the following command:
$ kubectl get ns kube-system -o jsonpath='{.metadata.uid}'
8c4498337-358b-4dc0-be52-14440f4e061e
Get License
Go to Appscode License Server to get the license.txt file. For this tutorial we will use KubeDB and KubeVault Enterprise Edition.
Install KubeDB
We will use helm to install KubeDB. Please install helm here
if it is not already installed.
Now, let’s install KubeDB.
$ helm repo add appscode https://charts.appscode.com/stable/
$ helm repo update

# Install KubeDB Enterprise operator chart
$ helm install kubedb appscode/kubedb \
  --version v2023.01.17 \
  --namespace kubedb --create-namespace \
  --set kubedb-provisioner.enabled=true \
  --set kubedb-ops-manager.enabled=true \
  --set kubedb-autoscaler.enabled=true \
  --set kubedb-dashboard.enabled=true \
  --set kubedb-schema-manager.enabled=true \
  --set-file global.license=/path/to/the/license.txt
Let’s verify the installation:
$ watch kubectl get pods --all-namespaces -l "app.kubernetes.io/instance=kubedb"

NAMESPACE   NAME                                            READY   STATUS    RESTARTS   AGE
kubedb      kubedb-kubedb-autoscaler-54fcfbcdb7-28wc7       1/1     Running   0          2m22s
kubedb      kubedb-kubedb-dashboard-599fdd8d8f-tnj6l        1/1     Running   0          2m22s
kubedb      kubedb-kubedb-ops-manager-868d684c84-7v9dz      1/1     Running   0          2m22s
kubedb      kubedb-kubedb-provisioner-75b544fdf4-w6z8l      1/1     Running   0          2m22s
kubedb      kubedb-kubedb-schema-manager-66d686b986-kskfj   1/1     Running   0          2m22s
kubedb      kubedb-kubedb-webhook-server-677b88d9bb-29qln   1/1     Running   0          2m22s
Install KubeVault Enterprise Operator
$ helm install kubevault appscode/kubevault \
  --version v2022.12.28 \
  --namespace kubevault --create-namespace \
  --set-file global.license=/path/to/the/license.txt
Let’s verify the installation:
$ watch kubectl get pods --all-namespaces -l "app.kubernetes.io/instance=kubevault"

NAMESPACE   NAME                                                  READY   STATUS    RESTARTS   AGE
kubevault   kubevault-kubevault-operator-86b8c7f688-6ln65         1/1     Running   0          22s
kubevault   kubevault-kubevault-webhook-server-8554c7cd7f-j9w6q   1/1     Running   0          22s
Install KubeVault CLI
KubeVault provides a kubectl plugin to interact with KubeVault resources. Let’s install KubeVault CLI
Install Secret-store CSI Driver
$ helm repo add secrets-store-csi-driver https://kubernetes-sigs.github.io/secrets-store-csi-driver/charts
$ helm install csi-secrets-store secrets-store-csi-driver/secrets-store-csi-driver --namespace kube-system
Install Vault specific CSI Provider
$ helm repo add hashicorp https://helm.releases.hashicorp.com
$ helm install vault hashicorp/vault \
    --set "server.enabled=false" \
    --set "injector.enabled=false" \
    --set "csi.enabled=true"
Create Namespace and Secret
To keep everything isolated, we are going to use a separate namespace demo throughout this tutorial.
$ kubectl create namespace demo
namespace/demo created
We need to create a storage secret for our backend. here, we are using Amazon EKS.
$ echo -n '<your-secret-key-id-here>' > secret_key
$ echo -n '<your-secret-access-key-here>' > access_key
$ kubectl create secret generic -n demo aws-secret \
    --from-file=./secret_key \
    --from-file=./access_key
secret/aws-secret created
Also, We have created an S3 bucket in Amazon to use this as our Vault Backend. We have created a bucket named vault-demo-1 in us-east-1 region. KubeVault supports various storage backends, you can find the details in Storage Backend
Deploy VaultServer
Now, we are going to deploy the VaultServer.
apiVersion: kubevault.com/v1alpha2
kind: VaultServer
metadata:
  name: vault
  namespace: demo
spec:
  replicas: 1
  version: 1.12.1
  allowedSecretEngines:
    namespaces:
      from: All
    secretEngines:
      - redis
  backend:
    s3:
      bucket: "vault-demo-1"
      region: "us-east-1"
      endpoint: s3.amazonaws.com
      credentialSecretRef:
        name: aws-secret
  unsealer:
    secretShares: 5
    secretThreshold: 3
    mode:
      kubernetesSecret:
        secretName: vault-keys
  terminationPolicy: WipeOut
In this yaml,
spec.replicasspecifies the number of Vault nodes to deploy. It has to be a positive number. Note: Amazon EKS does not support HA for Vault. As we using Amazon EKS as our backend it has to be 1.spec.versionspecifies the name of theVaultServerVersionCRD. This CRD holds the image name and version of the Vault, Unsealer, and Exporter.spec.allowedSecretEnginesdefines the Secret Engine informations which to be granted in this Vault Server.spec.backendis a required field that contains the Vault backend storage configuration.spec.unsealerspecifiesUnsealerconfiguration.Unsealerhandles automatic initializing and unsealing of Vault.spec.terminationPolicyfield is Wipeout means that vault will be deleted without restrictions. It can also be “Halt”, “Delete” and “DoNotTerminate”. Learn More about these HERE .
Let’s save this yaml configuration into vault.yaml and deploy it,
$ kubectl apply -f vault.yaml
vaultserver.kubevault.com/vault created
Once all of the above things are handled correctly then you will see that the following objects are created:
$ kubectl get all -n demo
NAME          READY   STATUS    RESTARTS   AGE
pod/vault-0   2/2     Running   0          64s

NAME                     TYPE        CLUSTER-IP     EXTERNAL-IP   PORT(S)             AGE
service/vault            ClusterIP   10.100.41.92   <none>        8200/TCP,8201/TCP   67s
service/vault-internal   ClusterIP   None           <none>        8200/TCP,8201/TCP   67s

NAME                     READY   AGE
statefulset.apps/vault   1/1     72s

NAME                                       TYPE   VERSION   AGE
appbinding.appcatalog.appscode.com/vault                    75s

NAME                              REPLICAS   VERSION   STATUS   AGE
vaultserver.kubevault.com/vault   1          1.12.1    Ready    91s

NAME                                                                   STATUS    AGE
vaultpolicybinding.policy.kubevault.com/vault-auth-method-controller   Success   61s

NAME                                                            STATUS    AGE
vaultpolicy.policy.kubevault.com/vault-auth-method-controller   Success   64s
Use Vault CLI
We will connect to the Vault by using Vault CLI. Therefore, we need to export the necessary environment varibles and port-forward the service.
$ export VAULT_ADDR=http://127.0.0.1:8200
$ export VAULT_TOKEN=(kubectl vault root-token get vaultserver vault -n demo --value-only)
Now, Let’s port-forward the service and interact via CLI,
$ kubectl port-forward -n demo service/vault 8200
Forwarding from 127.0.0.1:8200 -> 8200
Forwarding from [::1]:8200 -> 8200

##Check Vault Status
$ vault status
Key             Value
---             -----
Seal Type       shamir
Initialized     true
Sealed          false
Total Shares    5
Threshold       3
Version         1.12.1
Build Date      2022-10-27T12:32:05Z
Storage Type    s3
Cluster Name    vault-cluster-3bd6b372
Cluster ID      15df69fb-e717-9af1-8d00-0f4cc9df97d4
HA Enabled      false
Deploy Redis Standalone Database
Now, we are going to Install Redis with the help of KubeDB. Here is the yaml of the Redis CRD we are going to use:
apiVersion: kubedb.com/v1alpha2
kind: Redis
metadata:
  name: redis-standalone
  namespace: demo
spec:
  version: 7.0.6
  storageType: Durable
  storage:
    storageClassName: "gp2"
    accessModes:
      - ReadWriteOnce
    resources:
      requests:
        storage: 1Gi
  terminationPolicy: WipeOut
Let’s save this yaml configuration into redis-standalone.yaml
Then create the above Redis CRD
$ kubectl apply -f redis-standalone.yaml
redis.kubedb.com/redis-standalone created
In this yaml,
spec.versionfield specifies the version of Redis. Here, we are using Redisversion 7.0.6. You can list the KubeDB supported versions of Redis by running$ kubectl get redisversionscommand.- Another field to notice is the
spec.storageTypefield. This can beDurableorEphemeraldepending on the requirements of the database to be persistent or not. spec.storagespecifies PVC spec that will be dynamically allocated to store data for this database. This storage spec will be passed to the StatefulSet created by KubeDB operator to run database pods. You can specify anyStorageClassavailable in your cluster with appropriate resource requests.- Lastly, the
spec.terminationPolicyfield is Wipeout means that the database will be deleted without restrictions. It can also be “Halt”, “Delete” and “DoNotTerminate”. Learn More about these HERE .
Once these are handled correctly and the Redis object is deployed, you will see that the following are created for redis-standalone:
$ kubectl get all -n demo -l 'app.kubernetes.io/instance=redis-standalone'
NAME                     READY   STATUS    RESTARTS   AGE
pod/redis-standalone-0   1/1     Running   0          2m19s

NAME                            TYPE        CLUSTER-IP      EXTERNAL-IP   PORT(S)    AGE
service/redis-standalone        ClusterIP   10.100.27.224   <none>        6379/TCP   2m21s
service/redis-standalone-pods   ClusterIP   None            <none>        6379/TCP   2m21s

NAME                                READY   AGE
statefulset.apps/redis-standalone   1/1     2m25s

NAME                                                  TYPE               VERSION   AGE
appbinding.appcatalog.appscode.com/redis-standalone   kubedb.com/redis   7.0.6     2m32s
Let’s check if the database is ready to use,
$ kubectl get redis -n demo
NAME               VERSION   STATUS   AGE
redis-standalone   7.0.6     Ready    5m54s
Create Redis SecretEngine
Here, we are going to create a Redis SecretEngine. Secret engines are components that store, generate, or encrypt data. Secret engines are provided some set of data, they take some action on that data, and they return a result.
apiVersion: engine.kubevault.com/v1alpha1
kind: SecretEngine
metadata:
  name: redis-secret-engine
  namespace: demo
spec:
  vaultRef:
    name: vault
    namespace: demo
  redis:
    databaseRef:
      name: redis-standalone
      namespace: demo
    pluginName: "redis-database-plugin"
In this yaml,
spec.vaultRefis a required field that specifies anAppBindingreference which is used to connect with a Vault server.spec.redisspecifies the configuration required to configure Redis database secret engine.
Let’s save this yaml configuration into redis-secret-engine.yaml and deploy it,
$ kubectl apply -f redis-secret-engine.yaml
secretengine.engine.kubevault.com/redis-secret-engine created
Let’s check the Secrets list,
$ vault secrets list
Path                                                                        Type         Accessor              Description
----                                                                        ----         --------              -----------
cubbyhole/                                                                  cubbyhole    cubbyhole_a8440898    per-token private secret storage
identity/                                                                   identity     identity_e2462dcc     identity store
k8s.2903de3f-2693-44e3-b50d-aad10b403c1e.kv.demo.vault-health/              kv           kv_bab72ce4           n/a
k8s.2903de3f-2693-44e3-b50d-aad10b403c1e.redis.demo.redis-secret-engine/    database     database_c8d1044e     n/a
sys/                                                                        system       system_abe38f09       system endpoints used for control, policy and debugging
Create Database Roles
Now, we are going to create a Redis database secret engine role to specify permissions to the user.
apiVersion: engine.kubevault.com/v1alpha1
kind: RedisRole
metadata:
  name: write-read-role
  namespace: demo
spec:
  secretEngineRef:
    name: redis-secret-engine
  creationStatements:
    - '["~*", "+@read","+@write"]'
  defaultTTL: 1h
  maxTTL: 24h
In this yaml,
spec.secretEngineRefis a required field that specifies the name of aSecretEngine.spec.creationStatementsis a required field that specifies a list of database statements executed to create and configure a user.spec.defaultTTLis an optional field that specifies the TTL for the leases associated with this role. Accepts time suffixed strings (“1h”) or an integer number of seconds. Defaults to system/engine default TTL time.spec.maxTTLis an optional field that specifies the maximum TTL for the leases associated with this role. Accepts time suffixed strings (“1h”) or an integer number of seconds. Defaults to system/engine default TTL time.
Let’s save this yaml configuration into redis-secret-engine.yaml and apply it,
$ kubectl apply -f write-read-role.yaml
redisrole.engine.kubevault.com/write-read-role created
Let’s verify the redisrole status,
$ kubectl get redisrole -n demo
NAME              STATUS    AGE
write-read-role   Success   2m
Create Service Account
apiVersion: v1
kind: ServiceAccount
metadata:
  name: app-service-account
  namespace: demo
$ kubectl apply -f app-service-account.yaml
serviceaccount/app-service-account created
Create Secret Role Binding
apiVersion: engine.kubevault.com/v1alpha1
kind: SecretRoleBinding
metadata:
  name: secret-role-binding
  namespace: demo
spec:
  roles:
    - kind: RedisRole
      name: write-read-role
  subjects:
    - kind: ServiceAccount
      name: app-service-account
      namespace: demo
In this yaml,
spec.rolesis a required field that specifies the roles list for which theVaultPolicywill be created.spec.roles.kindis required field specifies the kind of the resource being referenced, in our case it isRedisRole.spec.roles.namecontains the name of the object being referenced.spec.subjectsis a required field that contains a list of references to the object or user identities on whose behalf this request is made. These object or user identities will have read access to the k8s credential secret. This can either hold a direct API object reference or a value for non-objects such as user and group names.
$ kubectl apply -f secret-role-binding.yaml
secretrolebinding.engine.kubevault.com/secret-role-binding created
Let’s verify the secretrolebinding status,
$ kubectl get secretrolebinding -n demo
NAME                  STATUS    AGE
secret-role-binding   Success   90s
Generate SecretProviderClass
Now, we are going to generate a SecretProviderClass to specify driver configurations and provider-specific parameters to the CSI driver.
$ kubectl vault generate secretproviderclass secret-provider-class -n demo      \
                                     --secretrolebinding=demo/secret-role-binding \
                                     --vaultrole=RedisRole/write-read-role \
                                     --keys username=redis-creds-username --keys password=redis-creds-password -o yaml


##generated yaml

apiVersion: secrets-store.csi.x-k8s.io/v1
kind: SecretProviderClass
metadata:
  creationTimestamp: null
  name: secret-provider-class
  namespace: demo
spec:
  parameters:
    objects: |
      - objectName: redis-creds-username
        secretKey: username
        secretPath: /k8s.2903de3f-2693-44e3-b50d-aad10b403c1e.redis.demo.redis-secret-engine/creds/k8s.2903de3f-2693-44e3-b50d-aad10b403c1e.demo.write-read-role
      - objectName: redis-creds-password
        secretKey: password
        secretPath: /k8s.2903de3f-2693-44e3-b50d-aad10b403c1e.redis.demo.redis-secret-engine/creds/k8s.2903de3f-2693-44e3-b50d-aad10b403c1e.demo.write-read-role
    roleName: k8s.2903de3f-2693-44e3-b50d-aad10b403c1e.demo.srb-demo-secret-role-binding
    vaultAddress: http://vault.demo:8200
    vaultSkipTLSVerify: "true"
  provider: vault
status: {}
Let’s apply the generated SecretProviderClass yaml,
$ kubectl apply -f secret-provider-class.yaml
secretproviderclass.secrets-store.csi.x-k8s.io/secret-provider-class created
Deploy the Microservice
apiVersion: v1
kind: Pod
metadata:
  name: demo-app
  namespace: demo
spec:
  serviceAccountName: app-service-account
  containers:
    - image: jweissig/app:0.0.1
      name: demo-app
      imagePullPolicy: Always
      volumeMounts:
        - name: secrets-store-inline
          mountPath: "/secrets-store/redis-creds"
          readOnly: true
  volumes:
    - name: secrets-store-inline
      csi:
        driver: secrets-store.csi.k8s.io
        readOnly: true
        volumeAttributes:
          secretProviderClass: "secret-provider-class"
Let’s save this yaml configuration into demo-app.yaml and deploy it,
$ kubectl apply -f demo-app.yaml
pod/demo-app created
Now, we are going to verify the pod status,
$ kubectl get pod demo-app -n demo
NAME       READY   STATUS    RESTARTS   AGE
demo-app   1/1     Running   0          50s
Exec into the Microservice Pod
Now, we are going to exec into the pod and check if it contains any redis secrets or not.
$ kubectl exec -it -n demo demo-app -- sh

/app # df
Filesystem           1K-blocks      Used Available Use% Mounted on
overlay               83873772   3446200  80427572   4% /
tmpfs                    65536         0     65536   0% /dev
tmpfs                  1982300         0   1982300   0% /sys/fs/cgroup
/dev/nvme0n1p1        83873772   3446200  80427572   4% /dev/termination-log
tmpfs                  1982300         8   1982292   0% /secrets-store/redis-creds
/dev/nvme0n1p1        83873772   3446200  80427572   4% /etc/resolv.conf
/dev/nvme0n1p1        83873772   3446200  80427572   4% /etc/hostname
/dev/nvme0n1p1        83873772   3446200  80427572   4% /etc/hosts
shm                      65536         0     65536   0% /dev/shm
tmpfs                  1982300        12   1982288   0% /run/secrets/kubernetes.io/serviceaccount
tmpfs                  1982300         0   1982300   0% /proc/acpi
tmpfs                    65536         0     65536   0% /proc/kcore
tmpfs                    65536         0     65536   0% /proc/keys
tmpfs                    65536         0     65536   0% /proc/latency_stats
tmpfs                    65536         0     65536   0% /proc/timer_list
tmpfs                    65536         0     65536   0% /proc/sched_debug
tmpfs                  1982300         0   1982300   0% /sys/firmware

/app # cd /secrets-store/redis-creds

/secrets-store/redis-creds # ls
redis-creds-password  redis-creds-username

/secrets-store/redis-creds # cat redis-creds-username
V_KUBERNETES-DEMO-APP-SERVICE-ACCOUNT_K8S.2903DE3F-2693-44E3-B50D-AAD10B403C1E.DEMO.WRITE-READ-ROLE_

/secrets-store/redis-creds # cat redis-creds-password
CFsnTt2YRDXkAGmDsTX-

/secrets-store/redis-creds # exit
So, we have successfully accessed the Redis secret inside the pod.
We have made an in depth video on Manage Redis Secrets using KubeVault along with KubeDB. You can have a look into the video below:
Support
To speak with us, please leave a message on our website .
To receive product announcements of KubeVault, follow us on Twitter .
To receive product announcements of KubeDB, follow us on Twitter .
To watch tutorials of various Production-Grade Kubernetes Tools Subscribe our YouTube channel.
More about Redis in Kubernetes
Go through the concepts of KubeVault
If you have found a bug with KubeDB or want to request for new features, please file an issue .